On this page
A split test is one link with several variants behind it: your flows or ready-made URLs. The network sends each visitor to one of the variants by the rules you set. Use it to compare landings, prelandings and creatives on the same traffic, to split visitors by country and device, and to cap the number of leads per variant. You can also have the network send more traffic to the variant that performs better.
Split tests are in the Flows › Split tests menu, if the network shows it. For agencies the same menu is called Traffic. If the item is missing, the network has hidden split tests: If a section is missing from the menu.
How a split test picks a variant#
When a visitor opens a split test link, the network checks in order:
-
Split test filters. If the visitor fails a filter in the Cloak and filters block, the visitor gets the split test's trafback and the variants are not even considered: Filters for the whole split test.
-
Matching variants. Of the active variants, the network keeps those whose conditions the visitor meets: country, device, filters and URL lists, lead limit. You set the conditions in the variant window: Variant settings.
-
Probabilities. The matching variants get shares by the probabilities you set: Probability.
-
Algorithm. If you select one, it shifts the shares toward the variants with better metrics: Algorithm.
-
Rotation. It decides whether the same visitor returns to the same variant: Rotation.
If no variant matches, the visitor gets the split test's trafback: the white site or the URL from the Cloak and filters block.
Split test list#
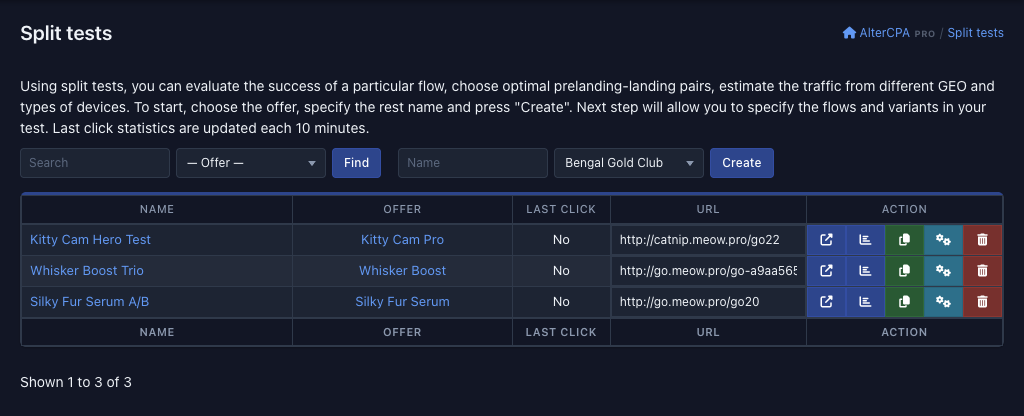
The Split tests page shows your split tests, newest first, 30 per page. The search and the create form are above the table. To find a split test, enter part of its name or its number into the Search field and click Find. To show the tests of one offer only, select the offer in the list or click its name in a table row.
 1234
| Column | What it shows |
|---|---|
| Name | The name of the split test. Click it to open the settings page, not the statistics |
| Offer | The main offer of the split test. Click it to keep only the tests of this offer in the list |
| Last click | When a visitor last came to the split test link. The data is collected every 10 minutes. Until there is a click, it says “No” |
| URL | The split test link. Click the field to select the whole link |
| Action | Buttons, described below |
Columns of the split test list.
The buttons in the Action column have no labels. Hover over a button to see its name in a tooltip:
| Button | What it does |
|---|---|
| URL | Opens the split test link in a new tab |
| Statistics | Opens the report for this split test: Statistics |
| Copy | Creates a copy: Copy and delete |
| Settings | Opens the settings page |
| Delete | Deletes the split test after you confirm “Do you really want to delete this item?”: Copy and delete |
Buttons of the split test list.
Creating a split test#
-
Open the list. In the Flows menu, select Split tests.
-
Fill in the form. Enter a name into the Name field and select the main offer.
-
Click Create. The settings page of the new split test opens with the message “Split test settings saved”. If the form is incomplete, the page shows “Error saving split test settings”.
-
Add variants. Until the split test has variants, all visitors get the trafback: Adding a variant.
You need the name to find the split test later, and you can change it in the settings. The main offer is set only when you create the split test and cannot be changed afterwards. It is there for convenience: the list ties the split test to it, and the add-variant window preselects this offer. It limits nothing else: you can add flows of other offers to the split test.
Settings page#
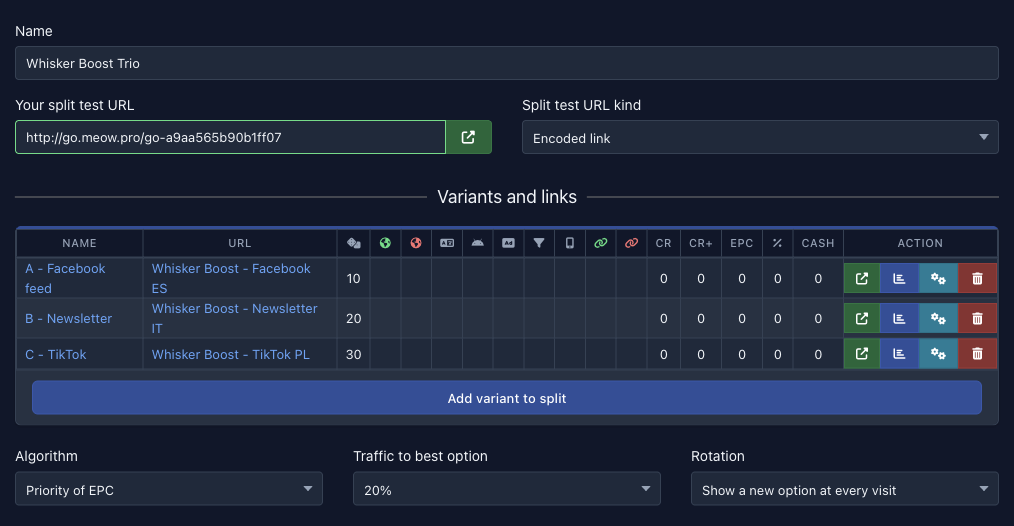
You open the page by clicking the split test name or the Settings button in the list. From top to bottom it has:
| Block | What it holds |
|---|---|
| Name | The name of the split test |
| Your split test URL and Split test URL kind | The link for your ads (the button on the right opens it in a new tab) and the list that sets how this link is built: Split test link |
| “Variants and links” | The table of variants and the Add variant to split button: Variants |
| Algorithm, Traffic to best option, Rotation | How to divide traffic between variants: Algorithm and rotation |
| Domain and Glue to split | The domain of the link and the domain glue: Domain. They show if your list has at least one domain: your own or a shared domain of the network |
| “Cloak and filters” | Filters for the whole split test and the trafback: Filters |
| “Tracking” | The tags of the link: Tags |
| Link and the Save button | The same link once more at the bottom, so you do not have to scroll back up |
Blocks of the split test settings page.
 123456
The page saves any change to its fields right away, as soon as you leave the field or select a value in a list. It sends the setting itself and updates the link. The Save button becomes inactive and gets the label “Split test settings saved”. If saving fails, the link frame turns red and the button says “Save” again: click it. Variants are not part of this saving, because the variant window has its own button.
To switch from the settings page to the split test statistics and back, click the split test name in the navigation bar above the page.
Variants#
A variant is a flow, a site or a ready-made URL that the split test sends a share of the visitors to. The variant takes the landing, prelanding, tags and pixels from the flow, so prepare the flows in advance: Creating a flow. The flow is not copied into the variant but used as it is, so changes to the flow take effect in the variant at once. You can use the same flow in any number of variants and split tests, and the statistics of each variant are counted separately.
Adding a variant
-
Open the window. On the settings page, click Add variant to split.
-
Select the offer. The Offer list has the main offer of the split test selected. To use a flow of another offer, change the offer and the flow list refreshes.
-
Select the flow. The Flow list has your flows for this offer, with the last one you created selected by default. Two other items work differently:
- — CREATE NEW FLOW — creates a flow together with the variant. The Landing and Prelanding lists appear in the window. The variant name is filled in as “offer name - XXXX”, where XXXX is replaced with the number of the new flow. The window selects this item on its own if you have no flows for the offer yet.
- — use URL below — makes a ready-made URL the variant. The URL field appears in the window, and it is required.
-
Check the name. The window fills in the variant name from the flow name. You can change it.
-
Click Add variant to split. The variant appears in the table.
A URL without a flow is good for sending part of the visitors to someone else's site. Redirects to third-party sites do not appear in the statistics. To test a combination from another offer, you do not need a URL: select the other offer and its flow in the window.
An agency has no flows, so the window has a Site list instead of the Flow list. It lists the landings and prelandings available to the agency for the offer together, with no groups. There is no item for creating a new flow. The window selects the site with the highest number, that is, the one added last, and it may be a prelanding, so check the selection. The window fills in the variant name from the site name. In the variant table, such a variant shows the site name instead of the flow, and clicking it opens a site preview.
A variant points to a flow. If you delete a flow, the variant stays in the table but has nowhere to send visitors. Before you delete a flow, remove it from the split tests: Copying and deleting a flow.
Variant table
Variants are sorted alphabetically by name. That is why names often start with letters or digits: “A - …”, “B - …”. A gray row with a pause icon is an inactive variant.
| Column | What it shows |
|---|---|
| Name | The name of the variant. Click it to open the settings window |
| URL | The flow of the variant. Click it to open the flow page in a new tab. For a variant with a URL, it shows the domain of that URL, and clicking opens the whole URL. The red text “No URL specified!” means the variant has neither a flow nor a URL |
| Dice icon, “Probability” | The probability you set, empty if not set |
| Green globe, “Countries” | The countries the variant is shown for: a flag if there is one country, otherwise their number |
| Red globe, “Exclude countries” | The countries the variant is not shown for: also a flag or a number |
| “Exclude bots by browser language”, “Exclude bots by User-Agent”, “Exclude bots without ad click ID”, “Exclude bots by filtering blacklists” | The icon is shown if the variant has the check on |
| “Traffic” | A device icon if the variant is limited by device |
| Green and red links, “URL white list” and “URL black list” | How many entries each list has |
| CR, CR+, EPC, percent icon, Cash | The metrics of the variant. The algorithm works on them: Variant metrics |
| Action | The variant buttons, see below |
Columns of the variant table.
Of the variant buttons, “URL” opens the variant link in a new tab, “Statistics” opens the reports for this variant (Statistics), “Edit” opens the settings window, and “Delete” deletes the variant after you confirm.
Variant settings
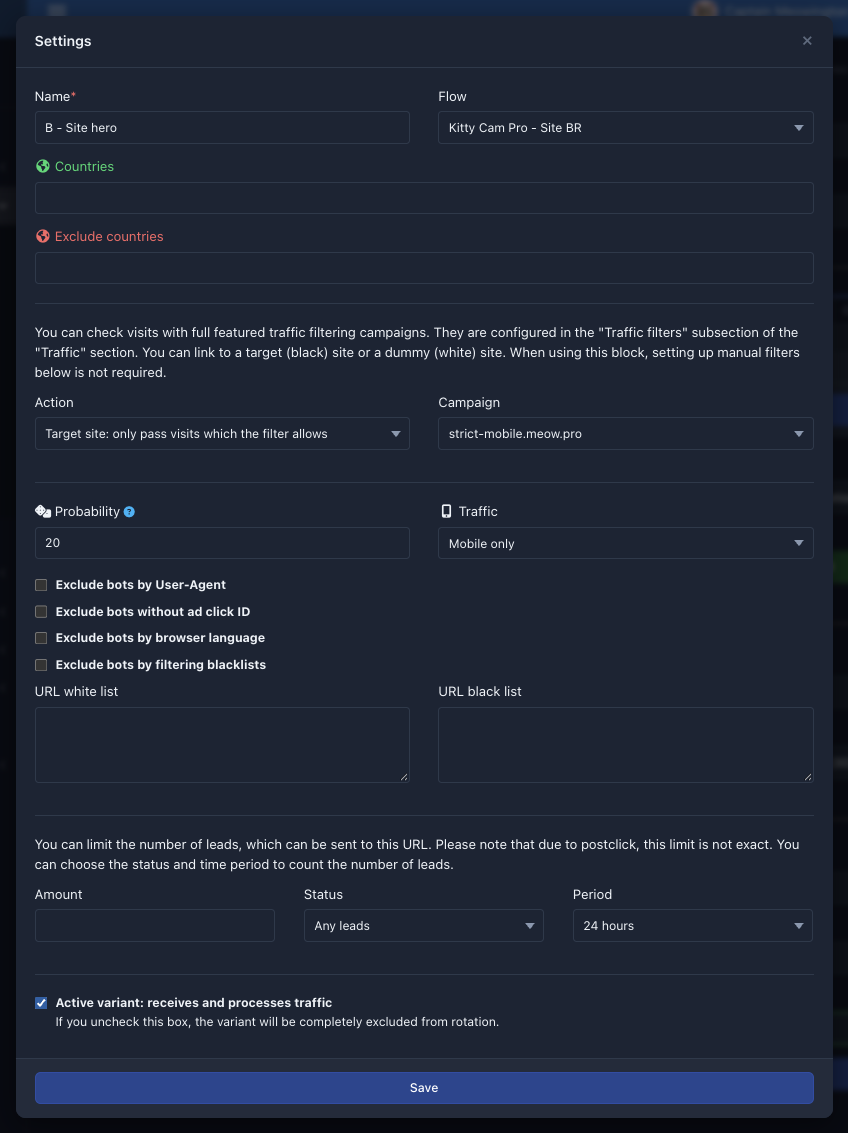
The “Settings” window opens when you click the variant name or the “Edit” button. It has its own Save button at the bottom.
 1234567
Where this variant sends its visitors:
| Field | What it does |
|---|---|
| Name | The name of the variant in the table and in the statistics |
| Flow | The flow of the variant. The item — use URL below — switches the variant to a URL. For an agency, the Site list replaces the flow |
| URL | The URL for a variant without a flow. The field is required until you select a flow |
| Work mode | How to send the visitor to the URL: by redirect, by showing a page or by showing content. The Filters and trafback page describes the methods. Only a variant with a URL needs it. |
Variant fields: where it leads.
Who may enter the variant. A visitor who does not meet the conditions does not reach this variant and gets another matching variant:
| Field | What it does |
|---|---|
| Countries | Only visitors from these countries see the variant. If the list is empty, visitors from any country see it |
| Exclude countries | Visitors from these countries do not see the variant. Handy together with Countries: variants for the countries you want and one general variant for the rest |
| Action and Campaign | The tie to a traffic filtering campaign, described below. They show if you have created at least one campaign |
| Traffic | The device type: “Any traffic”, “Mobile only”, “Desktop only”, “Mobile: only iOS”, “Mobile: except iOS”. The last two let you split mobile traffic by system and send it to suitable landing pages |
| Exclude bots by User-Agent | Blocks visits where the browser is recognized as a bot, a preview service or a spy service |
| Exclude bots without ad click ID | Lets in only visits whose link has the ad click ID of a popular network: fbclid for Facebook, gclid for Google, ttclid for TikTok, yclid for Yandex and others |
| Exclude bots by browser language | Blocks visits whose browser language belongs to none of the countries in the Countries list. If the list is empty, the check filters out no one |
| Exclude bots by filtering blacklists | Blocks visits whose IP address is in the blacklists, including your own (Filtering campaigns) |
| URL white list | Lets in only visits whose link has at least one entry from the list. Enter one entry per line. If a line has several words separated by commas, all of them are required. Case does not matter. For example, the entry adclid keeps those who came from the ads of a teaser network |
| URL black list | Blocks visits whose link has at least one entry from the list. The format is the same. It often helps against spy services that add special tags to the link |
Variant fields: display conditions.
The action of the campaign tie decides which visits go to the variant:
- Do not check visits through the traffic filter — the campaign is not used.
- Target site: only pass visits which the filter allows — the visits that the campaign let through reach the variant.
- Dummy site: only pass visits which the filter blocks — the visits that the campaign did not let through reach the variant.
This way one campaign splits visitors between two variants: the target one and the dummy. If you select no campaign, the variant makes no check. Create the campaign itself in the Flows › Traffic filter menu: Filtering campaigns.
In most cases you do not need filters inside variants. To filter out bots and off-target traffic as a whole, set up the split test filters: Filters for the whole split test. Use variant filters when the condition applies to only one variant of the test.
The remaining fields of the window — Probability, the lead limit and the activity checkbox — are described below.
Probability
In the Probability field, enter a whole number from 0 to 100: the share of traffic you want to give the variant. An empty field or 0 means the probability is not set. Only the variants that fit this particular visitor count. If a variant drops out by country or filter, its share goes to the others.
- If no variant has a probability, traffic is divided equally.
- Variants without a probability split equally what is left up to 100%. For example, A has 20%, B and C have none: A gets 20%, B and C get 40% each.
- If the probabilities add up to 100% or more, variants without a probability get no traffic, and the others split it in proportion to their numbers.
- If the probabilities add up to less than 100% and there are no variants without a probability, traffic is divided in proportion to the numbers. For example, 10, 20 and 30 give a ratio of 1 to 2 to 3: the variants get 16.7%, 33.3% and 50%.
Give each main variant a probability of 100%, and set neither a probability nor conditions on the spare one. While at least one main variant fits the visitor, the spare variant gets nothing. When no main variant fits, all traffic goes to the spare one. Plain country conditions and filters are a more reliable way to do the same.
Lead limit
The limit keeps a variant from collecting more leads than you want. When the variant has more leads than the limit, it gets no new visitors until the number of leads for the selected period falls to the limit or you raise the limit itself.
| Field | What it means |
|---|---|
| Amount | The maximum number of leads. An empty field means no limit |
| Status | Which leads to count |
| Period | Over what time to count |
Lead limit fields.
| Value of the “Status” list | Which leads count |
|---|---|
| Any leads | All |
| Valid leads only | All except leads in the “Trash” phase |
| Awaiting leads | Leads in the “Wait” phase |
| Leads approved | Leads in the “Hold” and “Approve” phases |
| Any except cancelled | Leads in the “Wait”, “Hold” and “Approve” phases |
| Any except new and deleted | Leads in any statuses except “New order” and “Deleted” |
Limit statuses. The references describe the phases and statuses of leads: Order phases, Order statuses.
| Value of the “Period” list | Over what time |
|---|---|
| 24 hours | The last 24 hours |
| From the midnight | From the start of the current day |
| Week | The last 7 days |
| Month | The last 30 days |
| Year | The last 365 days |
| Any time | No time limit |
Limit periods.
The limit is not perfectly exact, because a lead appears only after the click. Small overshoots are possible.
Variant activity
The Active variant: receives and processes traffic checkbox is on for a new variant. If you clear it, the variant drops out of the rotation completely and turns gray with a pause icon in the table. This way you can pause a variant without deleting it, and its statistics are kept.
Filters#
You can filter traffic on two levels: for the whole split test and for a single variant. The variant filters are described above, in the variant settings.
Filters for the whole split test
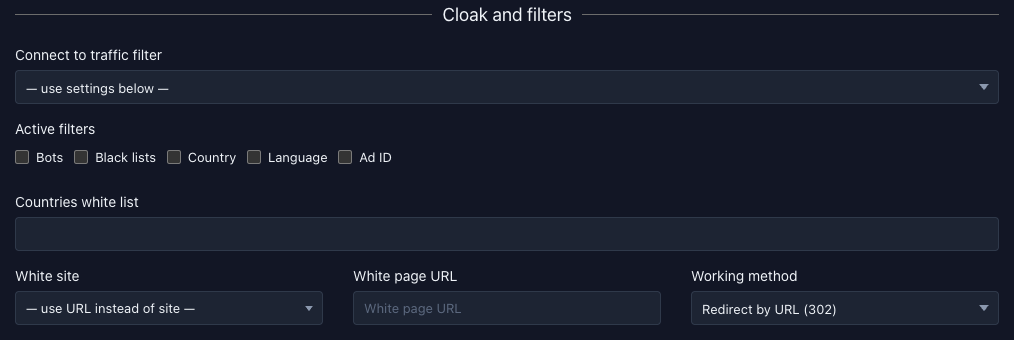
The “Cloak and filters” block on the settings page filters visitors out before a variant is chosen. It works like the block of the same name in a flow: Cloak and filters of a flow. The Filters and trafback page explains what each filter and display method means. A split test has some features of its own.
 1234
- Trafback. A visitor who fails a filter and a visitor who matches no variant get the same split test trafback. It is the White site, or, if none is selected, the White page URL opened by the method from the Working method list. If you select a white site, the URL and the method are not used. The list of white sites shows if the network allows them and you have some: White sites.
- Filtering campaign. The Connect to traffic filter list attaches a ready campaign from the Traffic filter menu: Filtering campaigns. The list shows if you have at least one campaign. When you select a campaign, the simple settings below are hidden but not reset: if the checkboxes were on before, they keep working together with the campaign. Clear the checkboxes you do not need before you select a campaign.
- Countries. The Country and Language filters work off the Countries white list list. Unlike a flow, a split test has no fallback list from the offer. While the list is empty, these two filters filter out no one.
Algorithm and rotation#
By default, traffic is divided by the probabilities you set. The algorithm and the “Traffic to best option” list change this in favor of the variants that perform better, and the rotation decides what to do with a returning visitor.
Variant metrics
Each variant in the variant table has five metrics. The network recalculates them every 10 minutes from the unique clicks and leads of the variant over the period set in the network settings (15 days by default). A variant with no clicks and leads in this period has all metrics equal to zero.
| Metric | What it is | How it is calculated |
|---|---|---|
| CR | Conversion of clicks into valid leads | Leads in the “Wait”, “Hold”, “Approve” and “Cancel” phases, that is, all except “Trash”, are divided by unique clicks and multiplied by 100 |
| CR+ | Conversion of clicks into confirmed leads | Leads in the “Hold” and “Approve” phases are divided by unique clicks and multiplied by 100 |
| EPC | Earnings per click | The commission for leads in the “Hold” and “Approve” phases is divided by unique clicks |
| Percent icon | Approve rate among valid leads | Leads in the “Hold” and “Approve” phases are divided by all valid leads and multiplied by 100 |
| Cash | Earnings | The commission for leads in the “Hold” and “Approve” phases |
Variant metrics.
The Metrics and formulas page covers these concepts and their formulas in more detail, and the Order phases reference lists the phases.
Algorithm
The Algorithm list chooses the metric the network uses to compare variants:
| List value | Metric |
|---|---|
| Uniform distribution | The metrics are not used, only the probabilities set the shares |
| Priority of conversion | CR |
| Priority of conversion and approve | CR+ |
| EPC priority | EPC |
| Priority of approve | Approve rate among valid leads (percent icon) |
| Priority of profit | Cash |
Distribution algorithms.
The algorithm does not replace the probabilities. It adjusts them. The network adds a tenth of the sum of the metrics of all matching variants to the metric of each matching variant, and the result is the weight of the variant. The share set by the probability is multiplied by the weight, so with equal probabilities traffic is divided in proportion to the weights. If all variants have zero metrics, the algorithm changes nothing.
For example, two variants have equal probabilities and EPC 3.00 and 1.00. The sum of the metrics is 4.00, and the addition is 0.40:
| Variant | EPC | Weight | Traffic share |
|---|---|---|---|
| A | 3.00 | 3.00 + 0.40 = 3.40 | 71% |
| B | 1.00 | 1.00 + 0.40 = 1.40 | 29% |
Example of redistribution with equal probabilities.
The losing variant is not eliminated, because the addition always leaves it a part of the traffic. With EPC 4.00 and 0.00, the variant with zero still gets about 8% and can prove itself.
Traffic to best option
The Traffic to best option list sets the share of visitors the network sends to the best variant without a draw. The other visitors are distributed as usual. The best variant is the one with the largest final share of traffic. With an algorithm selected, that is the probability you set multiplied by the weight. With even distribution, it is the one with the largest probability.
The values run from 0 to 100% in steps of 10, and above 90% there are 95% and 100%. The labels in the list warn that the higher the share, the more dangerous it is: “0% - smart distribution”, “50% - optimal option”, “80% - reasonable limit”, “90% - extremely dangerous”, “95% - critical limit”, “100% - problems are guaranteed”. The larger the share, the less chance the other variants get to prove themselves, and at 100% they get practically no traffic. The list makes sense only with an algorithm selected.
Rotation
The Rotation list decides what to do with a visitor who opens the link again:
- Remember the option for the visitor — a returning visitor lands on the same variant. The visitor's browser stores the binding for one hour. If the variant stops fitting the visitor in that time, the visitor gets another one.
- Show a new option at every visit — each new visit of the same visitor gets a variant the visitor has not seen yet. When the visitor has seen all of them, variants are chosen by the usual rules again. The visitor's browser stores this memory for a day.
The binding and the memory work through cookies, so for a visitor with cookies turned off, the variant is chosen anew every time.
Split test link#
You take the split test link on the settings page or in the split test list. It is the same link in both places. It does not change when you change the set of variants, the algorithm or the filters. Only what is part of the address itself can change it: the link kind, the domain and the tags. You can add and remove variants at will without touching your ads.
Link kind
You choose the link kind in the Split test URL kind list. There are three kinds: Classic link, Encoded link and Direct link. Each one works like the flow link kind of the same name and is described in detail on the Link kinds page. There is one difference: the “Classic link” of a split test does not lead to a site but carries the split test number, like the “Short link” of a flow.
Classic       https://go.meow.pro/go21
Encoded       https://go.meow.pro/go-a9aa565b90b1ff07
Direct        https://go.meow.pro/go-xa9aa565b90b1ff07
The network sets the prefix (go in the example). The kind you choose does not turn off the others: all three links work, and the choice only decides which one the link fields show. An agency chooses the split test link kind the same way.
Domain
The Domain list puts the selected domain into the link instead of the network address. It works the same way as for a flow: Link domain. Park your own domain first: Domain parking.
The glue button under the “Glue to split” label glues the domain to the split test, so that the split test opens on the main page of the domain. The Gluing a domain page covers the button states and gluing from the domain list. An agency has no flows, so it can glue a domain only to a split test.
Tags
The “Tracking” block holds the tag fields: SubID, UTM Source, UTM Content, UTM Campaign, UTM Term and UTM Medium. Agencies also have Click ID macro and Affiliate ID macro. Whatever you enter in a field goes into the link as a parameter: subid, utm_source, utm_content, utm_campaign, utm_term, utm_medium, extu and exts. An empty field adds no parameter. For example, with cats in the UTM Source field and {subid} in the SubID field, the link gets the suffix ?utm_source=cats&subid={subid}.
Tracker macros in curly braces stay in the link as they are. The Tags and pixels page describes what tags are for and how to pass them to trackers, and the Tags for agencies section covers agency tags.
Statistics#
The “Statistics” button in the list opens the statistics page of the split test: a click report where the rows are variants and the bottom row is the total. If some visits reached no variant (they failed the filter or matched no variant), a Trafback row is added. To pick the period and read the columns, see the Summary statistics page.
The “Statistics” button in a variant row opens a window with reports for this variant only: Leads and orders, Clicks statistics, Clicks by offer, Clicks by flow, Clicks by hour, Clicks by geo, Clicks by UTM, Clicks by sites and Browse clicks. Agencies also have External marks in this list. To read the lead and click lists, see the Leads and clicks page.
The CR, CR+, EPC, approve rate and cash metrics in the variant table are the same ones the algorithm works on: Variant metrics.
Copy and delete#
Copy. The “Copy” button in the list asks for the name of the new split test. Click Create, and the settings of the copy open. The copy gets the same settings and all the variants, but its own link and zero metrics. The domain glue is not copied: the glued domain stays with the original split test. A copy is handy when you need the same set of variants with other settings or tags.
Delete. The “Delete” button deletes the split test together with all its variants after you confirm. The flows they pointed to stay. Clicks and leads are not deleted.
Deleting a split test does not remove the domain glue: the domain keeps leading to the deleted split test. First unglue the domain or reassign it: Gluing a domain.