On this page
The platform has no way of knowing what you pay for traffic. Every click has a “price” field, and while it is empty, reports show no expense, no profit and no ROI. You can enter the cost per click in four ways: with a macro in the flow URL, with an ad network connection, with the manual import form and through the API. This page covers the first three, plus the request log of requests to ad networks.
The expense pages are in the Import spend and CPC item of the Flows menu. Your network can hide the item, and then it is missing from the menu: If a section is missing from the menu. Agencies do not use this section: the Traffic menu of an agency has no Import spend and CPC item.
Where expenses come from#
| Way | How the price gets into the click | Where you set it up |
|---|---|---|
| Cost per click macro | At the moment of the click: the ad network puts the price of this exact click into the URL | The Cost per click macros and Cost per click currency fields in the flow settings |
| Ad network connection | On a schedule: the platform takes the expense from the ad network's account and splits it among clicks | The Import spend and CPC page |
| Manual import | Once: you enter the total spend or the cost per click and select the clicks | The Manual import button |
| API | Once, from your script | The wm/cost function |
Ways to enter expenses.
The price is stored in the click together with its currency. Reports convert it to the report currency and use it in the CPC group columns: CPC: clicks, CPC: cost per click, CPC: total expense, CPC: profit and CPC: ROI (formulas: Metrics and formulas). For example, you spent 120 USD, and these clicks brought 180 USD in approved commission that is waiting for withdrawal. The profit is then 180 − 120 = 60 USD, and the ROI is 180 / 120 × 100 = 150%. In the click log, the price appears in the click window, in the Price row (Leads and clicks). Not every network shows these columns: if yours has not enabled them, reports do not show the price although the clicks hold it.
You can combine the ways, but a click has one price. Each new record goes over the previous one, and the last one wins. A manual import for a period overwrites the prices that came through the macro. On its next check, an ad network connection writes the price again to all clicks in its period, including a price you corrected by hand.
Cost per click macro in a flow#
The macro is the most accurate way: the ad network puts the price of each click into the URL itself, and the platform records it at the moment of the click. The fields themselves are described in flow settings. This section explains how the price works. Not every offer has these fields, and not every network enables them: if they are missing from the flow settings, enter expenses another way.
-
Enter the macro in the flow
Open the flow settings (Flows) and enter your ad network's macro in the Cost per click macros field, for example
{bid}. Look up the name of the cost per click macro in the help of the ad network itself. The platform adds acpcparameter with this value to the flow URL. -
Select the currency
In the Cost per click currency list, select the currency in which the ad network sends the price. The option “Default currency” means the main currency of your network.
-
Take the updated URL
Copy the flow URL again and paste it into the ad. The
cpcparameter appears only in the new URL.
When a visitor follows the URL, the ad network has already replaced the macro with a number, for example cpc=0.07. The platform records 0.07 as the price of this click in the flow's currency. These rules apply:
- The number must use a point and have up to six decimal places. A price below 0.0001 is recorded as zero. If the ad network did not replace the macro or sent something that is not a number, the click gets no price.
- Only a unique click gets the price, that is, a visitor's first visit through this flow in a day. Repeat visits and the move from a prelanding to a landing get no price, so one visit is not counted twice.
- If the field holds a number instead of a macro, that number becomes the price of every such click.
- The platform takes the currency from the Cost per click currency field (or from the
curparameter, if the URL has one). If neither has it, the main currency of your network is used.
If the ad network sent wrong prices, correct them retroactively. Manual import or wm/cost overwrites the price of the selected clicks. This works while the clicks are fresh: once they move to the archive, you can no longer correct the price (Fresh clicks and the archive).
Ad network connection#
If an ad network cannot pass the cost per click in the URL, the platform can take the expense from the network's account itself. To set this up, you create a connection: you provide an access key, choose a schedule and say which click tag holds the ad ID. The standard platform has eleven connection types: FB: Facebook, FB: Dolphin, FB: Dolphin Cloud, FB: FBtool, TikTok Ads, BIGO Ads, VK: VKontakte, MGid, MixAdvert, LuckyAds and AdPartner.
How a connection works
A connection works by itself, and you start nothing. When a check is due, the platform contacts the ad network and gets the expense by ads (or by groups and campaigns, depending on the Contains setting) for the selected period. For each ID, it picks your clicks of the period that have the same ID in the selected tag, splits the expense among them equally and records the resulting price for each click.
For example, the ad network reported that ad 1805200115 spent 120 USD yesterday. Your statistics for yesterday show 400 unique target clicks with utm_content=1805200115. Each of them gets the price 120 / 400 = 0.3 USD.
These rules follow:
- The expense is split only among the selected clicks, so the sum of their prices equals the expense reported by the ad network. A click that fails the conditions (unique, target, the right
utm_source, all described in the settings) gets no price, and its share goes to the other clicks. - Clicks with no ID in the tag stay without a price: the expense has nothing to attach to.
- All clicks of the period get the same average price: the platform does not know what each one cost separately.
- On every check, the price of the period's clicks is recalculated and written over the previous one, so today's figures are refined during the day.
The connection list and adding a connection
Open Import spend and CPC. At the top of the page are the Name field, the type list and the Add button, and next to them the Request log and Manual import buttons. On narrow screens, the add form is hidden behind the Add button. Below is the table of your connections.
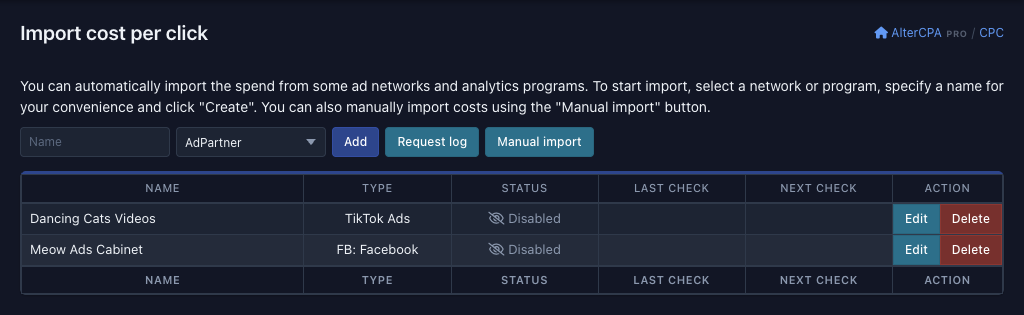 1234
| Column | What it shows |
|---|---|
| Name | The name you gave the connection |
| Type | The ad network or service |
| Status | Active or Disabled. Click the status to turn the connection on or off at once |
| Last check | When the connection last requested data |
| Next check | How long until the next check |
| Action | The Edit and Delete buttons. Deleting asks for confirmation and erases the connection together with its request log |
Columns of the connection table.
-
Create a connection
Enter a name (only you need it), select the ad network in the list and click Add. You cannot change the type later: for another ad network, create a new connection. A new connection is created disabled, and the platform opens its settings right away.
-
Fill in the settings
What to enter is described below.
-
Turn the connection on
Select the Activate cost-per-click import checkbox and click Save. The first check runs within a few minutes.
-
Check the result
The platform's requests to the ad network appear in the log, and the prices appear in the click log and in the CPC group columns.
Connection settings
To open the settings, click Edit in the connection's row. Above the fields is a hint for this particular network: where to get the access key and which period and check frequency to choose. The fields come in blocks.
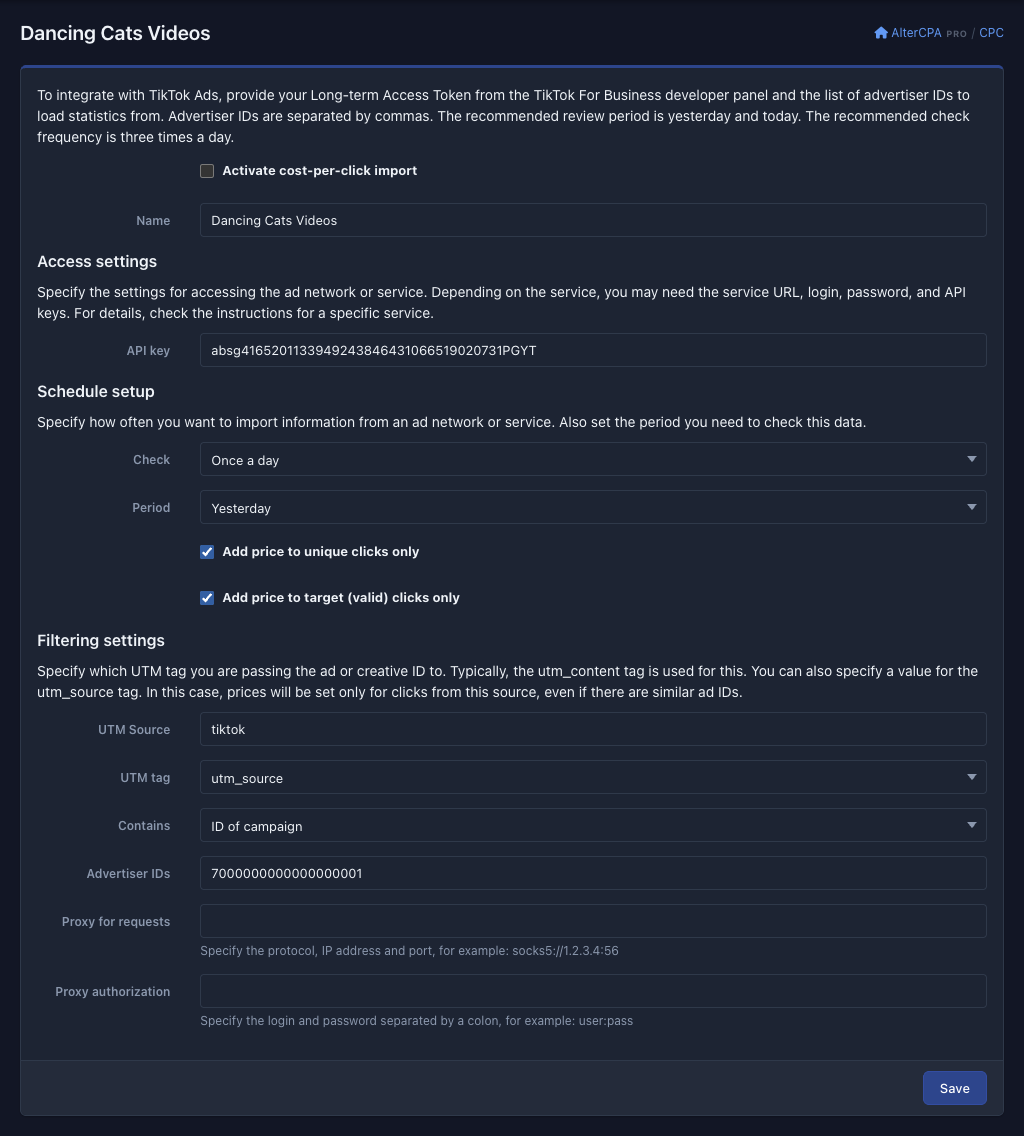 12345
Name and activation. The Activate cost-per-click import checkbox starts the connection, and without it the platform does not check the connection. The Name field takes any name you understand.
Access settings. The form shows only the fields that the selected ad network needs. What to enter depends on the network:
| Network | Access | Network fields |
|---|---|---|
| FB: Facebook | API key: Marketing API token | Contains: ad ID, ad set ID or campaign ID |
| FB: Dolphin | URL: the address where Dolphin is installed, in the form http://site.com/. API key: a user token, not an administrator token |
Contains: campaign ID, ad set ID or ad ID. Currency |
| FB: Dolphin Cloud | API key: the token from the Dolphin Cloud settings page, from the “Authorization token for integrations” field | Contains: campaign ID, ad set ID or ad ID. Currency |
| FB: FBtool | API key | Contains: ad ID, ad set ID or campaign ID. Status: which campaigns to import. Accounts: IDs separated by commas, empty for all |
| TikTok Ads | API key: Long-term Access Token | Contains: ad ID, ad group ID or campaign ID. Advertiser IDs separated by commas (required: nothing is imported without them). Proxy for requests and Proxy authorization |
| BIGO Ads | API key: Client ID. API secret: Secret | Refresh Token. Contains: ad ID, ad set ID or campaign ID |
| VK: VKontakte | Login: client ID. API secret: secret key | Contains: banner ID, group ID or campaign ID. The Automatically remove outdated tokens on request checkbox |
| MGid | Login: email. Password | None: the campaign ID must be in the selected tag |
| MixAdvert | Login. API key: the token from the API section | Contains: campaign ID or teaser ID |
| LuckyAds | API key: the token from the API section | Contains: campaign ID, ad group ID or ad ID. Currency |
| AdPartner | API key | None |
What to enter in the connection of each ad network.
The Contains list sets the level at which the ad network returns expenses: ads, groups or campaigns. The selected click tag must hold an ID of the same level.
In the Facebook form, two fields without labels sit under the Contains list. In the first, enter the address of a proxy for requests to Facebook (protocol, IP address and port, for example socks5://1.2.3.4:56). In the second, enter the proxy login and password separated by a colon. If you do not need a proxy, leave both empty.
The platform picks the expense currency as follows. For Facebook, FBtool, BIGO Ads, TikTok Ads, MGid and MixAdvert, the currency comes from the ad network. For Dolphin, Dolphin Cloud and LuckyAds, you set it in the Currency field, and if the field is empty, the dollar is used. AdPartner always returns expenses in hryvnias, and VK in rubles: you cannot select another currency in these two connections.
Schedule. The Check and Period fields and two checkboxes. The details are in Schedule and period.
Filtering settings. They define which clicks get the price.
- UTM tag — the click tag into which you pass the ID of the ad, group or campaign. This is usually
utm_content. The tags areutm_content,utm_term,utm_medium,utm_campaign,utm_source,domain,customerandsubid(Tags and pixels). The ID gets into the tag from the ad URL. Look up how to insert it in the ad network's help. - UTM Source — an optional value of the
utm_sourcetag. If you set it, only clicks with this source get the price, even if some ad IDs happen to match IDs from another ad network.
Tag values are matched exactly, and case matters.
Schedule and period
The Check list sets how often the platform contacts the ad network:
| Value | Interval |
|---|---|
| Once a day | 24 hours |
| Each hour | 1 hour |
| Once 3 hours | 3 hours |
| Twice a day | 12 hours |
| 3 times per day | 8 hours |
| Once 3 days | 3 days |
Check frequency.
The platform adds a random spread of 10% in both directions to the interval, so that checks of different connections do not line up at one moment. For this reason, the time in the Next check column is approximate.
The Period list sets the days for which the ad network returns the expense on every check:
| Value | Days covered |
|---|---|
| Today | Today only |
| Yesterday | The whole of yesterday, without today |
| Today and yesterday | Yesterday and today |
| 3 days | The three previous days and today |
| 1 week | The six previous days and today |
Check period.
The hints in the forms of almost all networks recommend the Today and yesterday period and the 3 times per day frequency: the expense is updated during the day, and yesterday's figures have time to reach their final values. The platform does not recalculate clicks outside the period, so choose a period in which the ad network can still revise the expense.
Two checkboxes in the same block are on by default:
- Add price to unique clicks only — only unique clicks get the price.
- Add price to target (valid) clicks only — clicks that the traffic filters screened out get no price (target clicks).
The expense is split only among the clicks that pass these conditions. If you clear a checkbox, the expense is split among more clicks, and the price of each click gets lower.
Manual expense import#
Use manual import when your ad network has no connection or the macro does not work, for example when you know the expense for a period and want to spread it across clicks. Open Import spend and CPC and click Manual import.
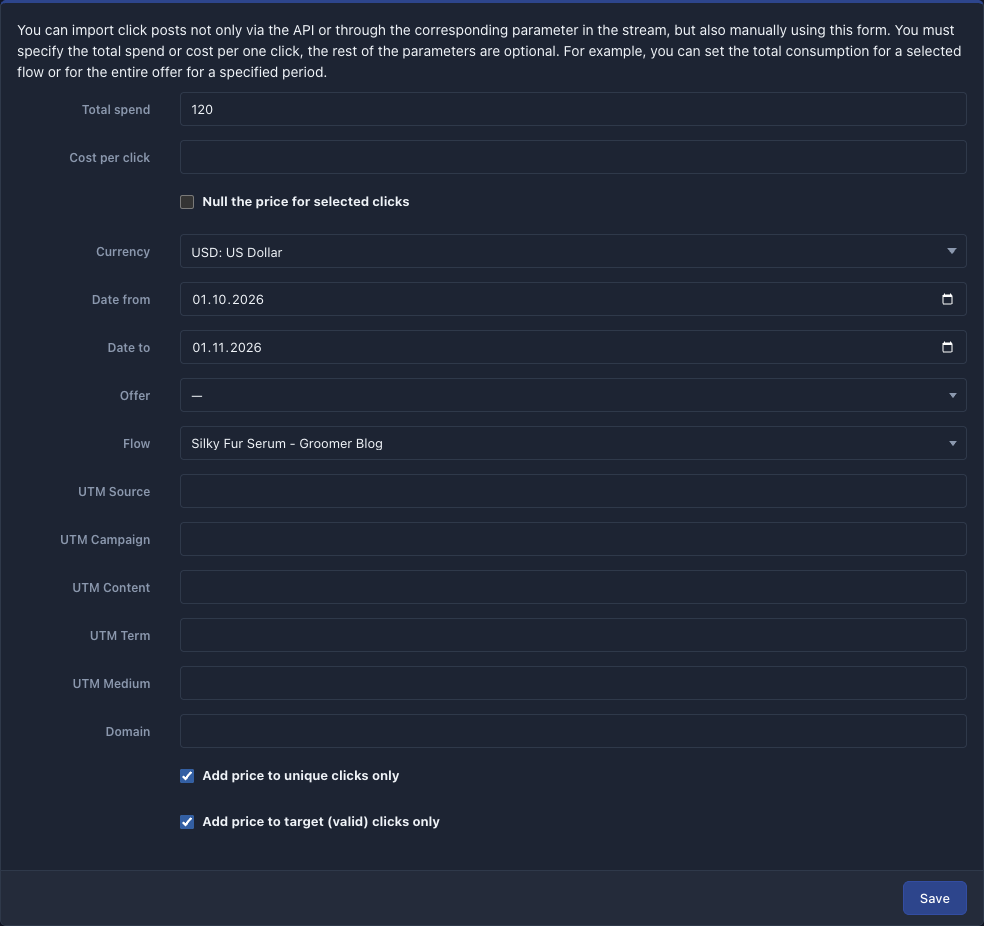 1234567
-
Set the price
Fill in one of the fields, Total spend or Cost per click, or select the Null the price for selected clicks checkbox. The platform divides the total spend by the number of selected clicks, and it sets the cost per click on each click as is. The cost per click takes up to six decimal places and cannot be below 0.0001.
-
Select the currency
The Currency list defaults to the main currency of your network.
-
Select the clicks
Set the period, offer, flow and tags (details below). The conditions are combined with AND: a click must match every condition you set.
-
Leave the selection conditions on
The Add price to unique clicks only and Add price to target (valid) clicks only checkboxes are on by default. Clear them only if the other clicks should get the price too.
-
Save
Click Save. “Success” or “Error occurred” appears at the top of the page.
-
Check the result
Look in the click log or in a report with the CPC group columns (Metrics and formulas).
Which price a click gets. If you fill in several ways, the highest-priority one applies: first the zero price, then the cost per click, then the total spend.
| What you set | The price of the selected clicks |
|---|---|
| Null the price for selected clicks | 0, the other price fields are ignored |
| Cost per click | This value, the same for every click |
| Total spend | The expense divided by the number of selected clicks |
Ways to set the price, from highest to lowest priority.
For example, a total spend of 120 USD on the flow Silky Fur Serum - Groomer Blog for October, which has 400 unique target clicks, gives each click the price 0.3 USD.
How to select clicks. All fields are optional, but the fewer conditions you set, the more clicks get the price.
- Date from and Date to — the period by click time. A click falls in the period if it was made after 00:00 of the start date and no later than 00:00 of the end date (in the time zone from your profile). To include the last day in full, enter the next day in Date to: for clicks from October 1 through October 31, enter 2026-10-01 to 2026-11-01.
- Offer and Flow — clicks of one offer or flow. The lists hold the offers available to you and your flows. If you have none, the matching field is not shown.
- UTM Source, UTM Campaign, UTM Content, UTM Term, UTM Medium and Domain — the values of click tags (Tags and pixels). Tag values are matched exactly, and case matters.
The price is always set on your clicks only. If the flow has a prelanding, the move to the prelanding gets the price, and the move from the prelanding to the landing does not.
If you set only a period, the price goes to all your fresh clicks in that period, across all flows and offers. If you set no conditions at all, it goes to all your fresh clicks. Clicks that the platform has already moved to the archive get no price (Fresh clicks and the archive). This lets you recalculate or zero out expenses in one go, but the form does not ask for confirmation and you cannot undo an import: the previous prices are overwritten, and you can restore them only with a new import.
What the response means. The message “Success” always appears for a cost per click and for a zero price, even if no fresh click matched the conditions, so check the result in a report. For a total spend, the form answers “Error occurred” if there are no matching clicks or if the price after division is below 0.0001. The same happens with a cost per click below 0.0001. An error also appears when none of the three price fields is filled in.
Request log#
The log holds the platform's requests to ad networks from connections. Manual import and the macro do not write to it. Open it with the Request log button on the Import spend and CPC page. While a connection is disabled or has not been checked yet, the log is empty.
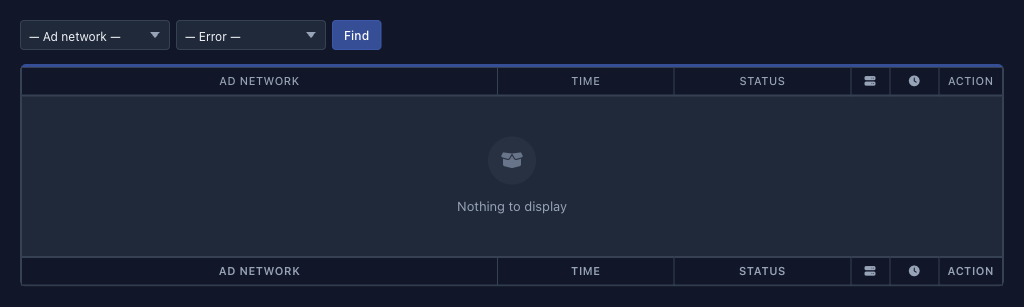 12
The table has one row per request:
| Column | What it shows |
|---|---|
| Ad network | The connection. Click the name to leave only its requests in the log |
| Time | When the request was sent |
| Status | Done if the ad network replied with anything, and Error if the reply was empty (for example, it did not reply in time). Click the status to filter the log by it |
| Server icon | The HTTP code of the ad network's reply: green for 2xx codes, orange for the others. A red cross means there was no reply at all |
| Clock icon | How long the request took |
| Action | The Show button opens the whole request |
Columns of the request log.
Above the table are two lists, Ad network and Error (the values are Success and Error), with the Find button. Each page holds 50 records. Page through the rest.
The Show button opens a window with the request URL and, if present, the sections GET, HTTP header, POST and POST decode (the request body in parsed form), Server response and CURL config (connection parameters). The cause of a refusal is in the server response, wherever the ad network stated it.
The Done status does not guarantee that a price appeared: the ad network may have answered with a refusal, for example because of a wrong key. Look at the HTTP code and the text of the reply. If requests go out and succeed but there is no price, check the UTM tag and Contains settings: the IDs may not match the ones in the click tags.
Request headers and URLs may hold access keys to the ad network. Do not send the log or its screenshots to outsiders.
Old records are deleted after the log retention period that your network sets.
Team expenses#
A teamlead has the same Import spend and CPC item in the Team menu, with the same pages. Team connections are stored apart from personal ones and set the price on the clicks of the whole team. Manual import there also acts on the clicks of the whole team, so it has no flow list, and the other conditions are the same as in the personal form. For the team menu, see Teamwork.
Expenses through the API#
The wm/cost function does the same as the manual import form: it sets a cost per click, a total spend or a zero price on the clicks selected by flow, tags and period, and it can run several operations in one request. The parameters, limits and examples are on the page API: flows.
As in the form, a new price is written over the previous one, and a period-only selection takes all your fresh clicks for that period across all flows and offers. This is the function's normal behavior: it lets you update or reset expenses for a period in bulk. If you need one flow or one campaign, specify the flow and tags.