On this page
This page covers two row-by-row lists and sending a lead by hand. In the lead list, each row is one of your orders. In the click log, each row is one click on your flows. Click a lead counter in a row of the summary report to get here. Where the numbers come from explains the source of the figures and why they differ from the reports. This page also shows how to send a lead manually to test an offer, a postback and the reports without any code.
Both lists show only your own leads and clicks. The team's shared lists are described on the Teamwork page.
Lead list#
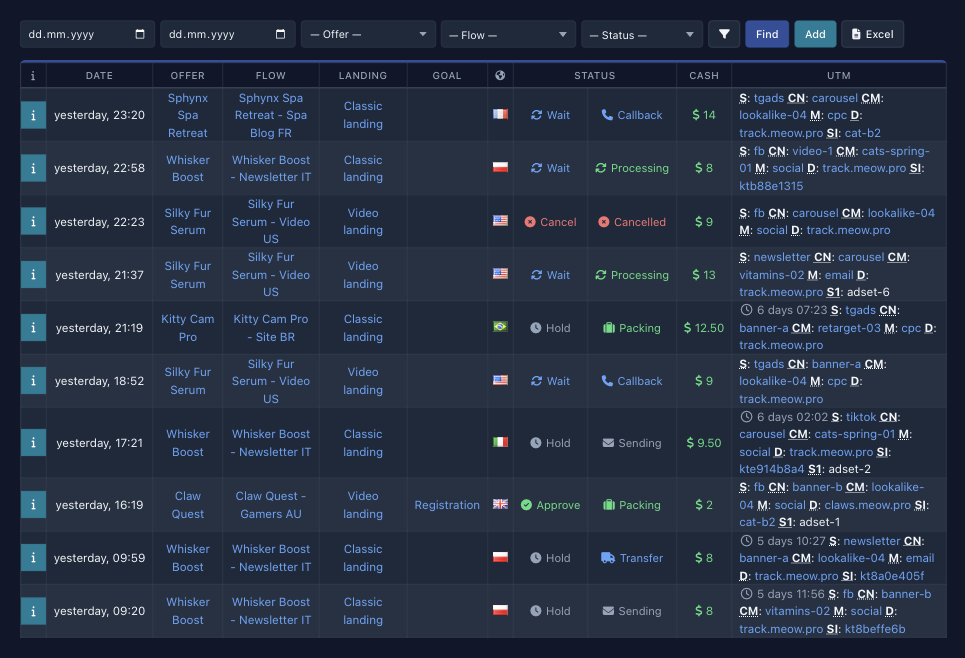
Open Leads in the main menu if your network shows it. Each row is one order, newest first, 30 per page. Click a value in a row (offer, flow, landing, country, status, tag) to keep only the orders with that value in the list. The search conditions are saved in the page address, so you can bookmark a filtered list.
 1234
A filter bar sits above the table:
- Two date fields — the start and the end of the period, by the order creation date.
- The Offer, Flow (if you have flows) and Status lists. The status list holds the five order phases.
- Find applies the conditions.
- The button with a funnel icon opens the advanced search window. The number next to it shows how many conditions from that window are on now (Filters).
- Add opens a window for choosing an offer to send a lead manually. The button is there if you can send leads.
- Excel exports the list to a file (details).
If there are no orders, the table shows “No statistics found for chosen period” instead of rows.
Main columns
Most networks have these columns. The network can turn off the Flow, Landing, country, Cash and UTM columns. The Landing column appears once you have had orders with a landing.
| Column | What it shows |
|---|---|
| Button with an “i” icon | Opens the order card |
| Date | When the order was created |
| Offer | The order's offer |
| Flow | Your flow that the order is recorded under. Empty for a lead sent manually without a flow |
| Landing | The landing the click arrived on |
| Column with a globe icon | The order's country: the flag, with the name in the tooltip |
| Status | The order's phase: Wait, Hold, Approve, Cancel or Trash. The Order phases section explains what each one means |
| Cash | Your commission for the order |
| UTM | The order's tags in compact form. For an order on hold, it also shows the hold period (see below) |
Main columns of the lead list.
In the UTM column, each tag has a letter. Click a tag to filter the list by it. Only filled-in tags are shown:
| Letter | Tag |
|---|---|
S |
UTM Source |
CN |
UTM Content |
CM |
UTM Campaign |
T |
UTM Term |
M |
UTM Medium |
D |
Domain |
C |
Customer |
SI |
SubID |
S1–S5 |
SubID 1 — SubID 5 (no filter link) |
UI |
UUID (no filter link) |
Letters in the “UTM” column.
The Tags and pixels and Third-party trackers pages explain where these tags come from. If an order is on hold now, the cell starts with a clock icon. Next to it you see how much time is left until the hold ends, or the date it ends.
The agency's list has no “Flow” and “UTM” columns. UID and SRC stand in their place. They hold your “Source order ID” and “Source affiliate ID”. Click a value to keep only the orders with it in the list. The advanced search window has two fields with the same names. An agency has no flows, so the bar above the table has no Flow list. The Landing column and field appear the same way as for an affiliate. The button with the “i” icon opens the order card, and your number is in its Ext ID row. The Tags and pixels page describes these tags.
Your manager chooses the statistics mode for connecting the agency: standard, short or extended. In extended mode, the order card shows the customer's data and the order contents. The mode also affects what leads/list returns.
Additional fields
Not every network has these columns and fields. Each network chooses whether to turn them on. If your network has not, the list does not show them.
| Column or field | What it shows |
|---|---|
| The second icon in the Status column | The order's full CRM status in the network, one of twelve. Every network has the main statuses. The extra steps of calling and delivery are not in every network. The full list is in the Order statuses section. You can select the same status in the Status field of the advanced search window. The network turns it on separately for the list and for the card |
| CRM status | The order's text status as the network shows it: text, not a code. It is shown as a column in the list or a row in the card |
| Goal | The offer goal the order was created for, as a separate column |
| Comment | The order comment as a separate column. The network chooses for which phases to show the comment, and the card shows it regardless of the column |
| Invoice, Cost price, Profit | The order amount, its cost price and the difference between them. Networks with a dropshipping forecast turn on these columns |
Additional columns of the lead list.
Order card
The button with the “i” icon in the first column opens the order card. The header shows the order number, and a table sits below it. The funnel icon to the right of a value keeps only the orders with the same value in the list.
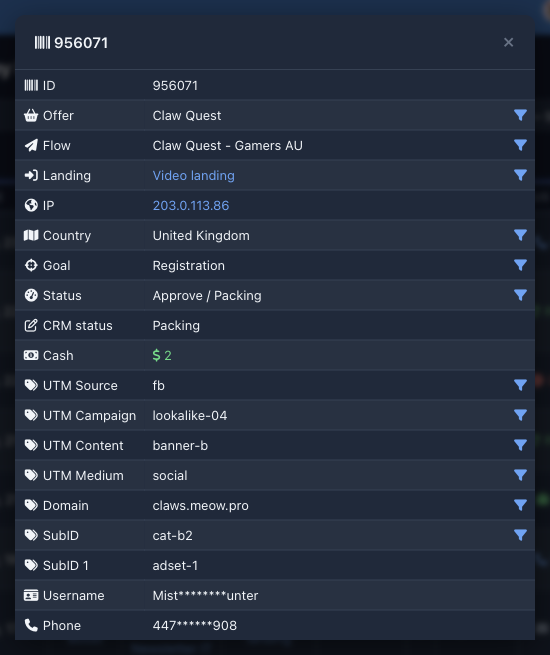
The card has two kinds of rows. The network shows the main ones almost everywhere, and the card shows only the filled-in ones:
- The order number, offer, Flow, Landing and Prelanding.
- The customer's IP address with a link to whois, and the country.
- Goal and Status.
- Cash — your commission.
- Decline reason — for declined orders. The reasons are listed in the Decline reasons section.
- Hold — for an order on hold: how much time is left until the hold ends.
- All the order's tags: UTM, Domain, Customer, SubID, SubID 1 — SubID 5, UUID and AdID.
- Comment — if the network shows comments for the order's phase.
- Under the table, a player with the call recording, if there is a recording and the network shows recordings.
The rest depends on the network. The network can hide the customer's data (Username, Phone, E-Mail, Address, Tracking code) or show it masked, with some characters replaced by asterisks. The Price and Goods rows (the order contents, with the price and amount of each item) and Cost price broken down into goods, service and delivery are also turned on separately. An extended status can appear after a slash next to the status.
Filters
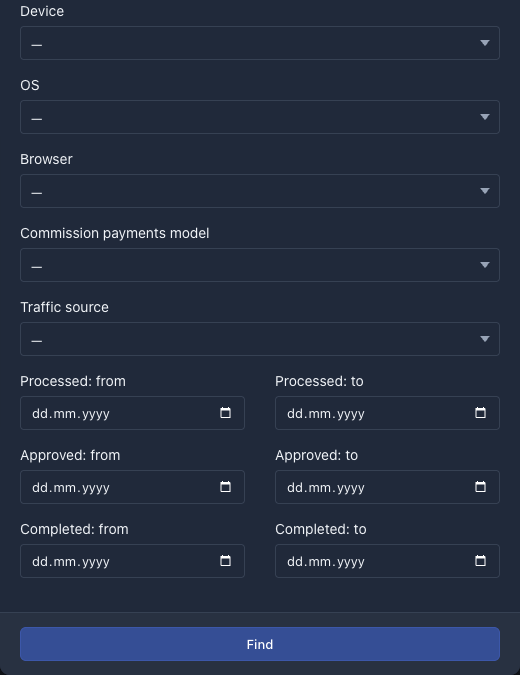
The bar above the table searches by dates, offer, flow and phase. The other fields are in the advanced search window, which the funnel icon opens. Tag fields search for an exact match of the whole value, and the empty value checkbox next to them keeps the orders without that tag.
| Field | What it searches |
|---|---|
| Country | Orders from the selected country |
| Landing, Prelanding | Orders from a specific site. The fields are there if you have already had orders with such sites |
| Goal | Orders by the offer goal. The list of goals appears when you select an offer that has goals |
| Goals | A group of goals from the network's list, if the network has set them up |
| Status | The extended order status. The field is there in networks that show it (Additional fields) |
| Decline reason | Orders with a specific decline reason |
| UTM: source, UTM: campaign, UTM: content, UTM: term, UTM: medium, Domain, Customer, SubID | Orders with this tag value |
| IP | Orders from this IP address |
| ID | The order with this number |
| Device, OS, Browser | Orders from a specific type of device, operating system or browser |
| Commission payments model | Orders calculated under this payments model |
| Traffic source | Orders from this source. The field is there if the network has traffic sources set up |
| Processed, Approved, Completed | Three pairs of “from” and “to” dates. More on them below |
Fields of the advanced search window.
 1
The three date pairs at the bottom search by other moments of an order, not by creation date:
| Pair of dates | The moment it searches by |
|---|---|
| Processed | When the order was taken into processing |
| Approved | When a decision was made on the order: it is approved or declined |
| Completed | When the order was bought out or returned |
Three pairs of dates in the advanced search window.
Export to Excel
The Excel button next to the filter bar exports the same list to an Excel file, with the same filters and in the same order. The export has no pages. The file holds all the orders found, up to a limit that the network sets: 10,000, 50,000 or 100,000 rows. The file is wider than the screen. It has separate columns for the click number, prelanding, decline reason, hold period, each tag and the IP address. Paste the click number from the file into the ID field of the click log to find that click.
If a lead is missing from the list
- Check the dates and conditions. The number by the funnel icon shows how many conditions of the advanced search window are on. Clear them and click Find.
- The list shows only your own orders. A team leader sees the orders of team members in the shared list.
- If you sent the lead through the API or the form, the platform may have rejected it: a duplicate order, a ban or a traffic filter. Such an order does not appear in the list.
Click log#
Open Browse clicks in the Statistics menu. Each row of the log is one click on your flows, including a click that the flow's filter cut off: its “Filter” column shows something other than “Valid”. The newest clicks come first, 30 per page. You cannot change this number.
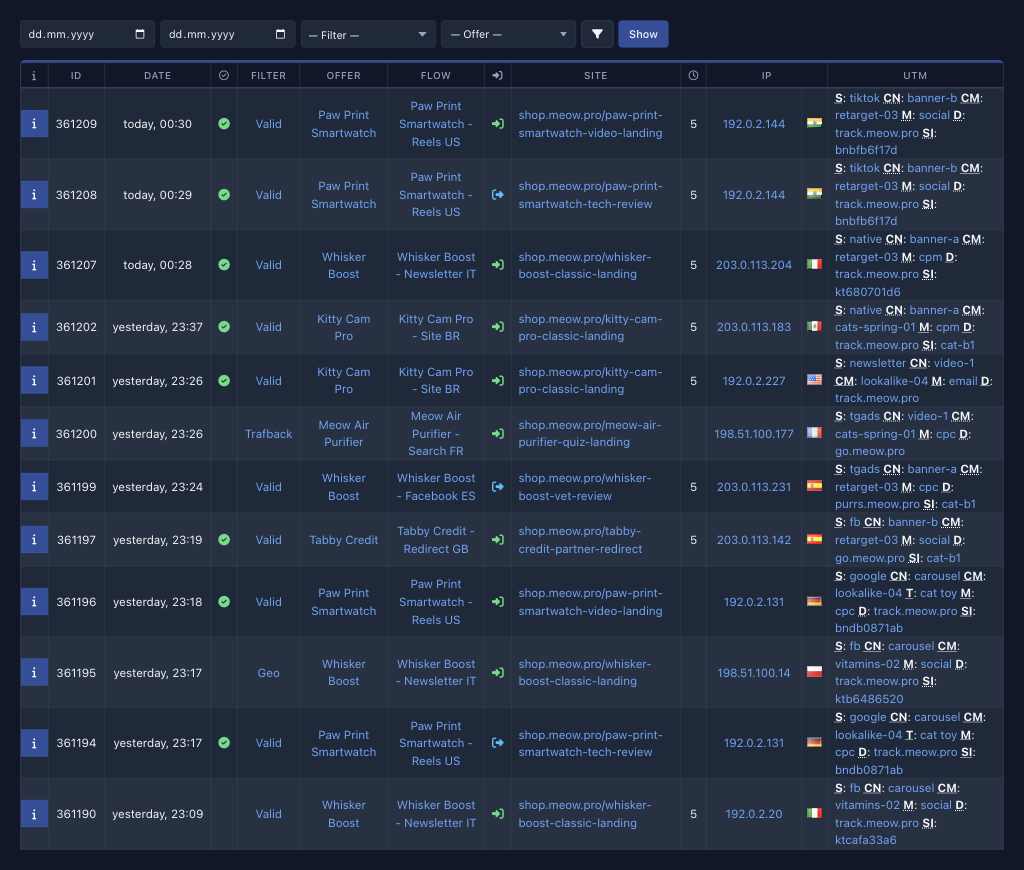
Above the table are two date fields (by the click date), the Filter and Offer lists and the Show button. The funnel icon opens a window with the other fields, and the number next to it shows how many of them are on.
Columns
| Column | What it shows |
|---|---|
| Button with an “i” icon | Opens the click card |
| ID | The click number |
| Date | When the click happened |
| Circled checkmark icon | The click counts as unique. The tooltip says “Unique” |
| Filter | The result of the flow's traffic check: “Valid” or the reason the click was cut off (see below) |
| Offer | The click's offer |
| Flow | Your flow. The column is there if you have flows |
| Entrance icon | Where the click arrived: green for a landing, blue for a prelanding. The tooltip shows its name |
| Site | The address of the landing or prelanding |
| Clock icon | The time on the page in seconds, in steps of 5 seconds. Empty if the time was not counted |
| IP | The IP address and the country flag. Click either one to keep only the clicks with this value in the log |
| UTM | The click's tags with the same letters as in the lead list. The tags S1–S5 and UI are not in the table, but the click card shows them. An agency also gets UID and SRC |
Columns of the click log.
The “Filter” column has nine values. In the Filter list, they have longer names than in the table:
| In the list | In the table | What it is |
|---|---|---|
| Valid visit | Valid | The click passed all the flow's checks |
| Ban: filters | Filter | The filtering campaign attached to the flow cut off the click |
| Ban: bot | Bot | The “Bots” filter triggered |
| Ban: blacklist | BL | The “Black lists” filter triggered |
| Ban: country | Geo | The “Country” filter triggered |
| Ban: language | Lang | The “Lang” filter triggered |
| Ban: ad click ID | Ad ID | The “Ad ID” filter triggered |
| Ban: device | Device | Traffic from a device that does not fit |
| Ban: trafback | Trafback | The split test found no suitable variant, so the click went to the trafback |
Result of click filtering.
Flow filters are described on the Filters and trafback and Filtering campaigns and white sites pages.
The button with the “i” icon opens the click card. It has the same data as the row, plus SubID 1 — SubID 5, UUID, the click's ad identifier (adid), User-Agent, browser and operating system. The IP address in the card is a link to whois, and the funnel icon to the right of a value keeps only the clicks with the same value in the log.
Filters
The bar above the table searches by click dates, filtering result and offer. The advanced search window adds the other fields. Tag fields search for an exact match, and the empty value checkbox next to them keeps the clicks without that tag.
| Field | What it searches |
|---|---|
| Country | Clicks from the selected country |
| Flow | Clicks of your flow |
| Site | Clicks on a specific landing or prelanding |
| UTM: source, UTM: campaign, UTM: content, UTM: term, UTM: medium, Domain, Customer, SubID | Clicks with this tag value |
| IP | Clicks from this IP address |
| ID | The click with this number |
| Device, OS, Browser | Clicks from a specific type of device, operating system or browser |
Fields of the advanced search window of the click log.
An agency's log has no Flow column or field. The window also has no separate fields for UID and SRC. To keep the clicks with one value, click it in the “UTM” column.
Additional fields
A click has a price only if someone passed it. You can pass it with a macro in the flow URL, by connecting an ad network, by manual upload or through the API (Expenses). Then the click card has a Price row. If the price is not set or is zero, there is no row, and the log table has no separate price column. Expenses and the metrics of the CPC group are calculated from the click price: see Metrics and formulas.
Send lead manually#
Manual sending creates an order right from the cabinet, with no code and no website. Use it to test an offer, a postback and the reports. The order is a regular one, as if sent through the API. It goes through the same checks, lands in your statistics, earns a commission and triggers the flow's postback (Test lead). You cannot delete an order from the cabinet. Warn the network manager first, and pick an offer and a flow that you do not mind seeing in the reports.
Who can use it
An affiliate can send leads manually if the network has allowed you to add orders through the API. An agency does not need this right, and the page is always available. Without the right, the send page shows a warning instead of the form: “You have no access to send leads manually or via API yet. Please contact technical support and request access to this functionality.” In this case, the cabinet has no send buttons elsewhere either.
Only an offer with lead intake through the API turned on accepts such leads. The selection list does not show other offers.
How to send a lead
-
Open lead sending. There are three ways. Open Send lead manually in the Flows menu (the network can hide this item). Or click Add on the “Leads and orders” screen, which opens a window with the Offer list and the Push new lead button. Or click Send lead manually in the left column of the offer page, under the button that creates a flow (Offer page), which opens the form of that offer right away.
-
Select an offer. In the Offer list, select an offer and click Select (in the window of the “Add” button, click Push new lead). If you started from the offer page, skip this step.
-
Fill in the form. The fields are described below. Phone and IP-address are required. Fill in the others as your task requires.
-
Submit the form. Click Add. The page reloads with a message at the top: “Success” or “Error occurred”. The form does not name the cause of an error. The
leads/adderrors section describes the typical causes. The lead appears in the Leads list.
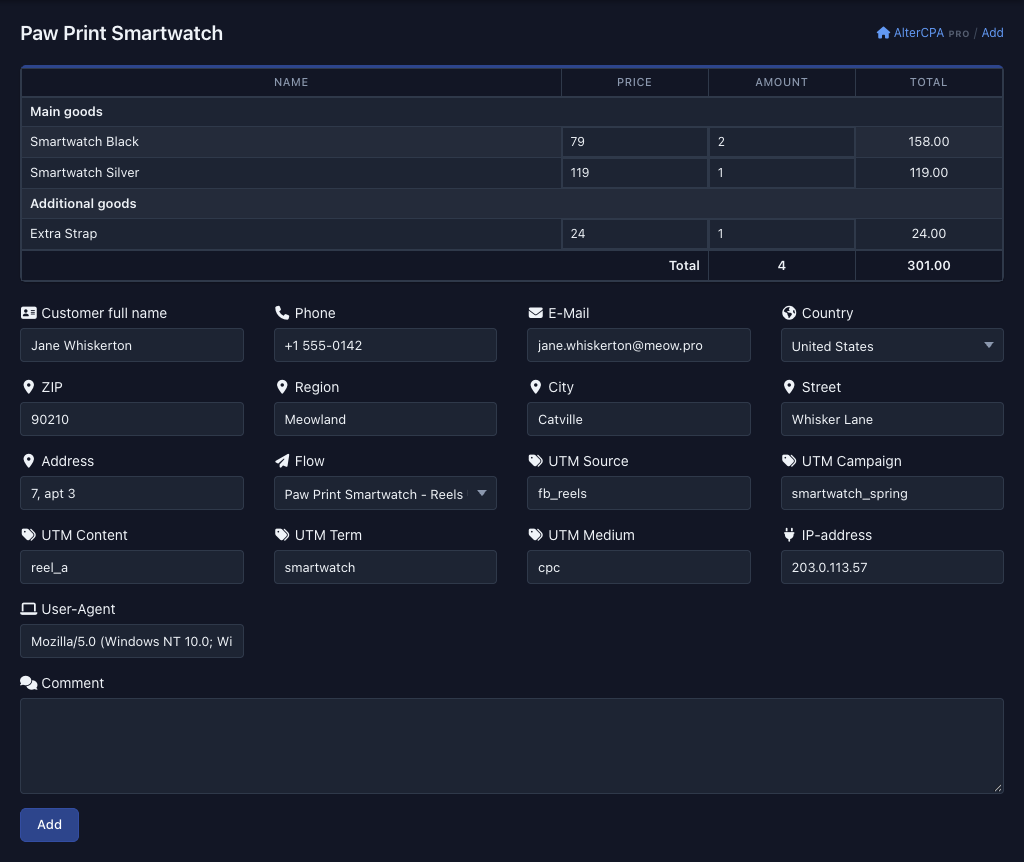 123
Form fields
The form adapts to the offer, and the offer can hide some fields. If the description below has a field that you do not see, the offer does not use it.
Order contents. An offer that sells a product shows a table at the top with the columns Name, Price, Amount and Total. If the offer has product variants, they are split into the groups “Main goods”, “Additional goods” and “Delivery processing”. Some variants have a checkbox instead of an amount. The amounts are prefilled with the default package, and you can change the price in the cell. The total at the bottom recalculates at once, and changing the country reloads the prices.
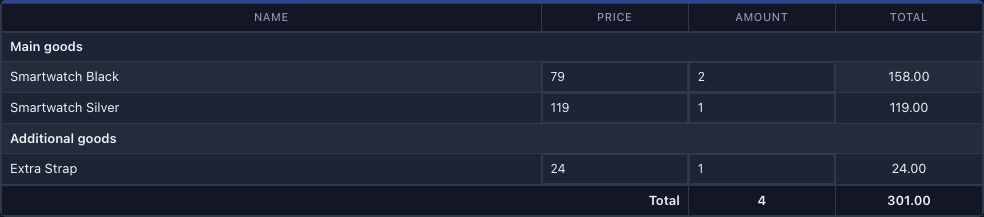
An offer without goods, for example an offer for registration, shows no table.
Customer and order data:
- Customer full name, Phone and E-Mail.
- Country: the list is limited to the offer's countries, and the selected country sets the prices and the order's country.
- Goal and Source — if the offer has goals and lets you select a traffic source.
- ZIP, Region, City, Street and Address — for offers with delivery.
- Flow — your flows for this offer. If you have no flows for the offer, the field is not there, and the lead is recorded under you without a flow.
- UTM Source, UTM Campaign, UTM Content, UTM Term, UTM Medium — you enter all five tags by hand to test postbacks and the reports by tags.
- The offer's own fields, if it has any: lists, text fields and file uploads.
- IP-address and User-Agent.
- Comment: goes into the order comment.
When you open the form and when you change the country, the IP-address field is filled with a random address of the selected country, and User-Agent with the string of your browser. You can replace both to test traffic filters and device detection.
A lead from the form has no click and no landing. Its click will not be in the click log, and its Landing column is empty. The form has no SubID field, so write the tag you will find the test by into UTM Campaign, for example test-001. Then find the lead by the “UTM: campaign” filter (Filters).
Offer set
Under the offer selection on the Send lead manually page, there can be a “Bulk lead sending” block with a table of offer sets, if the network has created any. The Show button opens a set. On the set page, select the offers with the checkboxes (you see only the offers you have access to), fill in the shared customer data and click Add. The platform creates a separate lead for each selected offer. The message “Success” means that at least one lead was created. Leads from a set are recorded under you without a flow.
The set has no order contents table and no Flow, Goal, Source or delivery address fields, and the list of countries is not limited to the offer's countries.
Agency
The agency's form differs: instead of the Flow field, it has two fields:
- Source order ID — required. The default is
auto: the platform fills in the next number in your numbering. - Source affiliate ID — optional.
The order is recorded as an agency lead with these IDs (Tags and pixels). In the menu of the agency's cabinet, Send lead manually is in the Traffic section, and the Send lead manually button is on every offer that accepts leads through the API.
How to run tests back to back
The main obstacle to repeated tests is duplicate blocking: the network can reject a second order for the same phone number. For such checks, there is a service number, 1234567890. The platform does not look for duplicates by phone for it, and the network cannot add it to the phone black list. With it, you can send orders one after another. If the network also blocks duplicates by email, leave the E-Mail field empty or change the address.
The platform does not recognize the service number as a phone number. An offer that validates the phone number will not accept it, and the platform cannot detect the country from it. Select the country in the Country field. To run tests through the API, see Test lead.