A flow is your connection to an offer: the link you send traffic to and all the settings of that link. Statistics for clicks and leads are counted per flow, so it helps to create separate flows for different sources and campaigns on the same offer. The number of flows is unlimited. You cannot change the offer of a flow. To work with another offer, create another flow. Flows are not available to the agency: it builds an offer link in the link generator.
Your flows are in the menu Flows › Flows by offers. You create them in the Offers catalog. You can also list, create, set up and delete flows through the API: Flows (API).
Flow list#
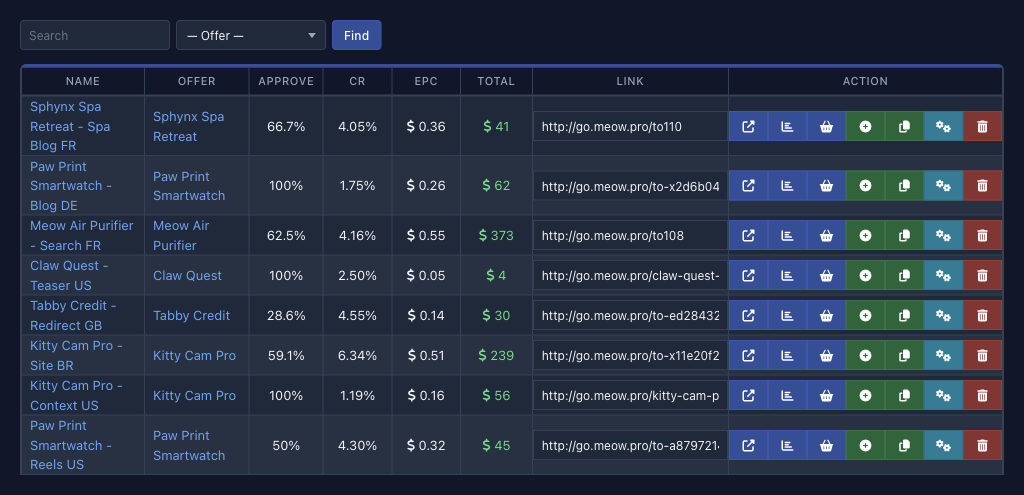
The Flows by offers section shows all your flows, newest first, 30 per page. Above the table are a search and a filter. Enter part of the flow name or its number in the Search field and click Find. To keep only the flows of one offer, select it in the Offer list. You can turn on the same filter by clicking the offer name in a table row.
 1234
| Column | What it holds |
|---|---|
| Name | The flow name. You need it only for search. Click it to open the settings |
| Offer | The offer of the flow. Click it to keep only the flows of this offer in the list |
| Approve, CR, EPC | Flow metrics. Not every network shows these three columns |
| Total | How much commission has been credited to you for the flow over all time |
| Link | The flow URL, or the code if the offer gives only a symbol code. Click it to select the whole value |
| Action | Buttons, described below |
Columns of the flow list.
Approve, CR and EPC are recalculated on a schedule over a recent period (15 days by default), not at the moment of a click. If the flow had no leads in this period (trash does not count), all three metrics are zero. The section Cached percentages explains where these figures come from. The formulas are on the Metrics and formulas page.
The buttons in the “Action” column have no labels. Hover over a button to see its name in a tooltip:
| Button | What it does |
|---|---|
| Link | Opens the flow URL in a new tab so you can check it. If the offer gives only a symbol code, this place holds the Code button, which copies the code to the clipboard |
| Statistics | Opens a window with reports for this flow only: Leads and orders, Clicks statistics, Clicks by hour, Clicks by geo, Clicks by UTM, Clicks by sites and Browse clicks |
| Offer | Opens the offer page of the flow |
| New flow | Creates another flow for the same offer right away, without confirmation, and opens its settings |
| Copy | Creates a copy of the flow: details |
| Settings | Opens the flow settings |
| Delete | Deletes the flow after confirmation: details |
Buttons of the flow list.
Creating a flow#
Flows are created from the offer catalog, which holds all the offers you can work with.
-
Open the catalog. Click Offers in the menu.
-
Find an offer. Use the catalog filters, described on the Offer catalog page.
-
Click the button. The Create new flow button is on the offer card in the catalog. On the offer page it is in the Flows block. Below it is the list of your flows for this offer, and you can open a flow's settings by clicking its name.
-
Confirm the new flow. The browser asks “Do you want to create a new flow with this offer?” Click OK.
-
Specify the settings. The settings page of the new flow opens with the message “New flow created, please specify its settings”. The flow URL is already at the top of the page, but before you send traffic, check the landing and the rest: flow settings.

The new flow gets the default settings:
- Name — the offer name and the flow number, for example “Catnip Cola - 111”. You can rename the flow in the settings.
- Landing — the offer's landing marked as the default one, or the first landing available to you if there is none. There is no prelanding.
- Traffic source — the first one the offer allows, if the offer distinguishes sources at all.
- Flow URL kind — classic. Postbacks are on for all five order phases, and the tags and pixels are empty.
If you see Request access to offer instead of Create new flow, the offer is closed to you. You get a flow for it after the network opens access. For details, see the Offer catalog page. If the offer is disabled, no flow is created, and you stay in the catalog.
Flow settings#
Open the settings with the Settings button in the flow list, by clicking the flow name, or right after you create a flow. It is one long page, and it differs for each offer: it shows only what the offer and the network allow. If the description below mentions a field you do not have, the offer or the network does not support it.
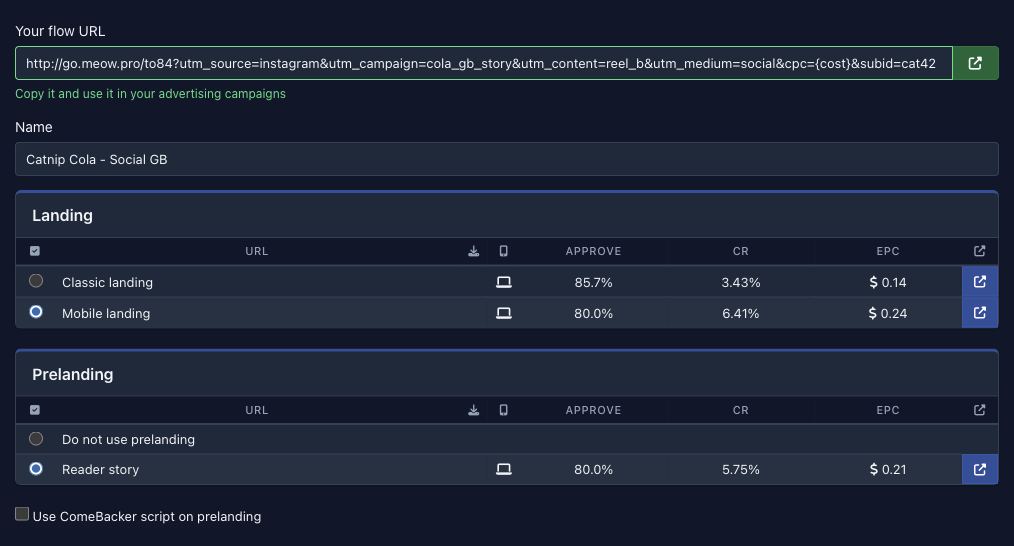
A field value is saved as soon as you change it and move on. After that the Save button at the bottom becomes inactive, its label changes to “Flow settings saved”, and the flow URL at the top and bottom of the page updates. A red frame around the link means the save failed. The Save button is then active again, so click it. If you click Save and nothing fails, you return to the flow list.
 12345
Flow URL and name
The flow URL is shown at the top of the page and again at the bottom, next to the Save button. Copy it and paste it into your ad campaign. The button next to the field opens the link in a new tab. For offers where the network issues a symbol code, the Flow symbol code field replaces the URL or sits next to it. Enter the code in the name of your ad campaign.
The URL may change after you edit the settings. Which settings affect it depends on the link kind (Link kinds). So copy the URL again whenever you edit a running flow.
The Name field is only for you. The name keeps letters, digits and the characters _, -, ., ,. Any other character, for example parentheses, # and /, is replaced with a space.
Landing and prelanding
The Landing table lists the landing pages of the offer that are available to you. Select the one to send traffic to. A table row holds:
- the landing name, or its address if it has no name.
- a download icon, if a ready-made archive exists for the landing: Downloading ready-made sites.
- a phone icon with a tooltip about mobile support: not intended for mobile devices, redirects to a mobile version, optimized for mobile devices, or responsive design.
- the landing's Approve, CR and EPC, if the network shows these columns.
- the last icon, which opens the landing in a new tab so you can see how it looks.
The Prelanding table appears if the offer has prelandings. Its first row, Do not use prelanding, is selected by default. If you select a prelanding, the flow URL opens it, and the landing is shown after it.
Below the prelanding table is the Use ComeBacker script on prelanding checkbox. ComeBacker works when a visitor tries to close the prelanding or leave it without using a link. The browser offers to stay on the page, and if the visitor stays, ComeBacker shows the next page, the landing.
Goods and prices
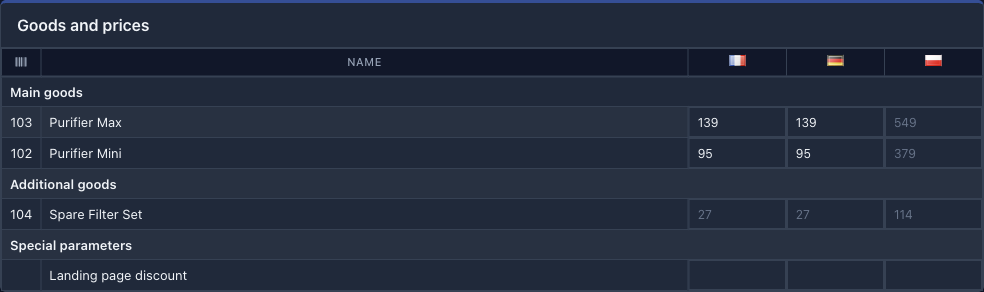
The Goods and prices block is present for offers that sell goods, if the network allows changing prices in flows. It is a table: the rows are the offer's goods (with the good number), and the columns are the countries where they are sold. If goods come in different types, they are split into groups: Main goods, Additional goods and Delivery processing. If the offer has no list of goods, the table has one row: the offer itself.
 123
In each cell you can enter your own price of the good in that country. The cell shows the offer price in gray, and it applies if you do not enter your own price. The last row, Landing page discount (if goods are split into groups, it sits under the Special parameters heading), sets the discount that the downloaded site shows. If the offer sets a lower price limit, you see it in the cell tooltip (“Min: …”). A price below the limit is highlighted in red and is not saved.
Your prices are inserted into the ready-made sites you download from the flow (Downloading ready-made sites) and into the orders of this flow, if the order has no price of its own for the good.
Flow URL kind and domain
These fields are present for offers that issue a flow URL (not only a code).
- Flow URL kind — a classic, short, encoded or direct link. The default is classic. The Link kinds page explains the differences.
- Domain — the domain the URL is built on. The option “use default domain” leaves the default domain, which the platform uses until you choose your own. The field is shown if the network allows domain parking and your list holds at least one domain: your parked domain or a shared domain of the network (Domain parking).
- Glue to flow — a button that glues the selected domain to this flow, so the flow opens on the main page of the domain without redirects. After you choose a domain, the button label shows the glue state: Gluing a domain.
Traffic source and Deeplink URL
Traffic source is present for offers that pay differently for different sources. Select the source your traffic comes from. The list holds only the sources the offer allows.
Deeplink URL is present for offers where the network turned on Deeplink and one of the landings is a redirect site. In this field you can enter the address of a specific page on the advertiser's site to send the visitor to. The address is saved only if the selected landing is a redirect site and the address is on one of the domains allowed for that site. Otherwise the platform does not save the new value and does not report an error. The value that was in the field before stays, and the field on the page does not change until you open the page again.
Cloak and filters
The Cloak and filters block is present for offers that allow working with trafback, and for those where the network has allowed it to you personally. There you choose how to filter out unwanted traffic and where to send it:
- Connect to traffic filter — a ready filtering campaign, if you created one. When you select a campaign, the simple filters below are hidden, and the checkboxes Bots, Black lists, Country and Language and the country list are reset. The Ad ID checkbox is not reset and keeps working together with the campaign: A campaign instead of simple filters.
- Active filters — the checkboxes Bots, Black lists, Country, Language and Ad ID, plus Own countries white list.
- White site (the list is present if you or your team have white sites) or White page URL — where to send the filtered-out traffic. Working method sets how to send it: by redirect, by displaying a page, or by displaying the content of a link. If a white site is selected, the address and the method are unavailable.
The Filters and trafback page explains each filter and method. Filtering campaigns are described on the Filtering campaigns and white sites page.
Postback
The Postback and tracking section begins with the flow's postback. The checkboxes Wait, Hold, Approve, Cancel and Trash select the order phases on which the platform calls your URL when an order changes to them. All five are on by default. Enter this URL in the Postback field. The button to the right of the field opens the Postback page with all your postbacks, not the log of this flow. The log is on the same page under the Log button (Postback log). The URL macros and the way postbacks work are described on the Postbacks page, and the phase values are in the section Order phases.
Tags and identifiers
The fields UTM Source, UTM Content, UTM Campaign, UTM Term, UTM Medium and Customer are present in every flow. Their values go into the flow URL and are saved in every click. The other tags are shown if the offer or the network allows them: SubID, SubID 1 to SubID 5 and ERID. The ERID value goes into the URL as the erid parameter and is saved in the click as a custom tag.
The page Tags and pixels explains what each tag is for and how to pass tags to trackers.
Pixels and conversion events
Next to the tags are the fields of ad networks and analytics systems. Each is shown only if the offer or the network allows it:
- Facebook and the FB conversion event list — the Lead event is selected by default.
- Google Analytics or Tag Manager and Google Analytics conversion.
- VK retarget, Yandex.Metrika, Mail Target, Tik-Tok and Likee.
A separate Facebook Conversion API block sends events to Facebook from the server and is shown by the same rule. In it you enter the Pixel ID and Pixel API token. For the lead stages, select Event: new, Event: hold and Event: approve (or “don't send”). Then set the Operating mode and, if needed, Proxy for postback.
The section Ad networks and analytics systems describes what the identifier looks like in each field and which events go to the site pages.
Cost per click macro
The Cost per click macros and Cost per click currency fields tell the platform how much each visit cost. They are present if the offer or the network allows them. In the first field, enter the macro that the ad network replaces with the click price, for example {bid}. It is added to the flow URL as the cpc parameter. The platform saves the incoming number as the click price of a unique visitor. If you enter a number instead of a macro, it is recorded as the price of a visit. In the second field, select the price currency. If you leave “Default currency”, the main currency of the network is used.
The page Expenses explains how the price reaches the reports and how else you can load expenses.
Your own code
If the offer allows it, the settings have fields for your code:
- Custom HTML code for the site header and Custom HTML code for the site footer — for offers with ready-made sites. The code is inserted into the pages directly.
- Tracking code for main pages and Tracking code for Thanks page — or the single field Tracking code for all pages if the offer does not tell pages apart. In external offers the code is included through an iframe.
The platform removes PHP inserts when you save. For details and examples, see Custom code on sites and Custom code in an iframe.
File for sending leads through the API
The administrator turns on sending orders by API, and you cannot turn it on in your personal account. If it is on and the offer accepts leads through the API, the Download API file for lead generation button appears at the bottom of the page. It opens a window with the offer and flow numbers and ready PHP code. The code takes the data of your site's form and sends the lead to the network. You can download the file from this window. The page Leads (API) describes how sending leads works.
Copying and deleting a flow#
Copy. The Copy button in the list asks for the name of the new flow. Click Create, and a copy opens with all the settings of the original flow: landing, prelanding, link kind, tags, pixels, postback, filters and prices. Statistics are not copied. A copy is handy when you need to launch a series of similar campaigns and change only the tags in each.
Delete. The Delete button asks “Do you really want to delete this flow? This action cannot be undone!”
After deletion, the clicks and orders remain but no longer belong to the flow, so you cannot see them under the flow anymore. The short, encoded and direct links of the deleted flow lead to the main page of the network, and the domain stays glued to the flow. The section What remains after deletion lists what else remains. Before you delete a flow, stop the campaign, change the link in it and unglue the domain (Domain parking).