On this page
A filtering campaign is a standalone traffic filter with its own settings, black lists, and statistics. You set it up once, then use it in one of two ways: download a ready-made file and put it on your own hosting, or connect the campaign to a flow or a split test. The simple filter checkboxes inside a flow are a lighter option, described on Filters and trafback. Use a campaign when they are not enough. It has a timetable, lists of languages and words in the URL, its own black lists, and a log that shows why each visit was filtered out.
This page also covers white sites, the dummy pages that a flow or split test shows to the visitors it filters out. Team members' campaigns, shared black lists, and the team's white sites are covered on Teamwork.
Open campaigns in the menu Flows › Traffic filter and white sites in Flows › White sites. For agencies, the Flows section is called Traffic. The network can hide any of these items. If you do not see them, your network does not have these tools.
Campaign list#
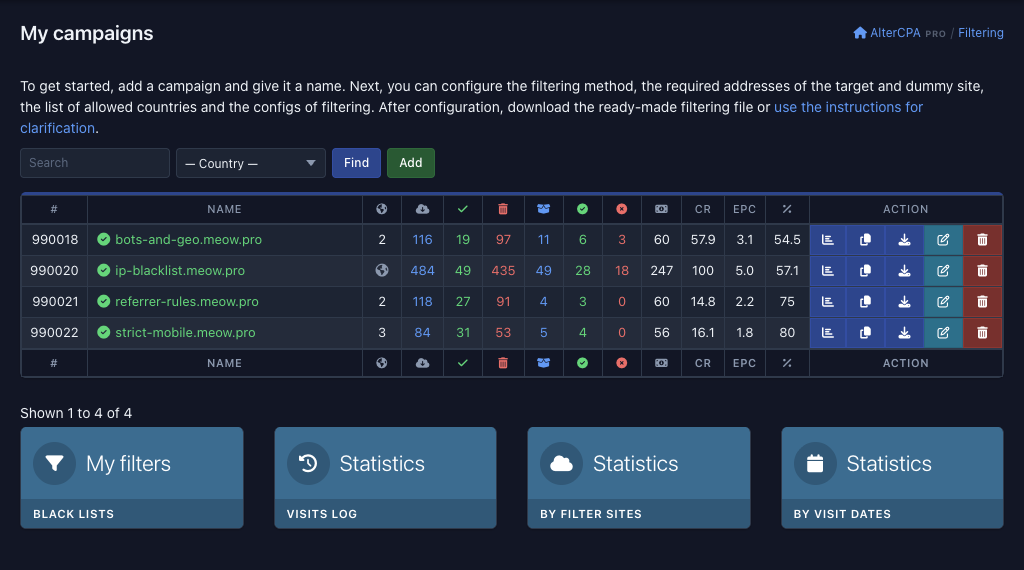
The Traffic filter page is titled “My campaigns”. The table lists your campaigns alphabetically, 30 per page. Above the table are a search by name, a country list, and the Find and Add buttons. Most column headers are icons. Hover over one to see the column name in a tooltip.
 123456
| Column | What it shows |
|---|---|
| # | The campaign number. |
| Name | The mode icon and the name. Click the name to open the settings. Green check mark: “Automated”. Yellow pause: “Paused”. Red stop: “Disabled”. Gray icon: the “Training” mode. A gray pause shows the dummy site, and a gray stop shows the target site. |
| Globe icon | The campaign's countries. A flag shows one country, a number shows several countries, and a gray globe shows “Whole world”. |
| Clicks, Target, Dummy | How many visits the campaign checked and how many of them went to the target site and to the dummy site. Click a number to open the visit log narrowed to those visits. |
| Leads arrived, Leads approved, Leads cancelled, Money earned | The mini-tracker figures. The postbacks of the campaign count them. |
| CR, EPC, Approve | CR: leads divided by target visits, as a percentage. EPC: earnings per target visit. “Approve”: approved leads divided by all leads that arrived, as a percentage. |
| Action | Statistics opens the visit log of the campaign, Copy makes a copy, the download icon gives you the filter file, Settings opens the campaign, and Delete removes it. |
Columns of the campaign list.
The “Clicks”, “Target”, and “Dummy” counters grow with the visits that reach the filter file. Visits checked by a campaign connected to a flow or a split test are not counted there. Look for them in the statistics.
Under the table are four tiles: My filters (black lists) and three Statistics tiles: “Visits log”, “By filter sites”, and “By visit dates”.
Copy. The Copy button asks only for a name. The copy gets all the settings of the original campaign, while its counters and lead figures start from zero.
Deletion. The campaign disappears together with its visit log. The flows and split tests it is connected to do not change. Before you delete a campaign, open them and select another campaign or the — use settings below — item.
Creating a campaign#
-
Click Add. The button above the table opens a window.
-
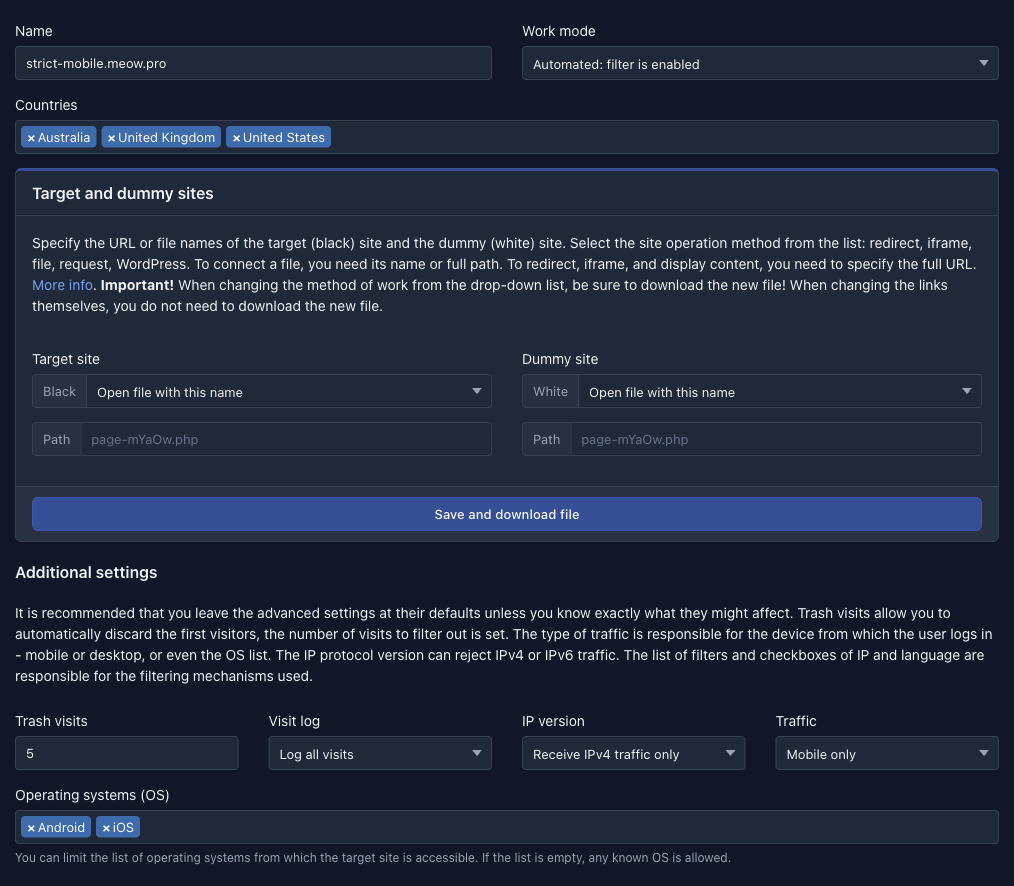
Fill in the fields. Name: any text that lets you recognize the campaign. Countries: the countries you accept traffic from. An empty list means “Whole world”. Target site and Dummy site: how to show each of the two sites and its address (see basic parameters for details). By default, both lists have the “Open file with this name” method selected, and the address label is “Path”. If you use another method, select it and enter the address.
-
Click Add in the window. The campaign appears in the list in the “Automated” mode.
-
Open the settings. Click the campaign name or the Settings icon in its row and adjust the parameters.
Basic parameters#
 123456
- Name
- A label for the campaign, just for you. The filter does not compare it with the address of the site the traffic goes to, so the name can be anything, for example
bots-and-geo.meow.pro. - Work mode
- Sets whether the campaign checks visits and what the visitor sees. The modes are described in the table below.
- Countries
- The countries you accept traffic from. If you select none, traffic is accepted from any country. We recommend setting a list, because it cuts off bots that come from remote servers.
- Target site and Dummy site
- Where to send a visit that passed the checks and where to send one that failed. For each, select how to show it and enter the address: a full URL, a path to a file, or nothing if the method does not need one. The label of the address field changes with the method.
The display methods in the lists are “Redirect by this URL (302)”, “Redirect and glue domain (301)”, “Redirect via separate page (meta)”, “Redirect via script (JS)”, “Open file with this name”, “Show this URL in iframe”, “Show the contents by URL (curl)”, “Show the contents by URL without changes”, “Connect to WordPress”, and “Show blank page”. Filters and trafback explains what each one does and when it fits. Leave the address field empty for “Connect to WordPress” and “Show blank page”.
In the addresses of the target site and the dummy site, you can use the macros {geo} (the visitor's country code in lowercase), {geoup} (the same in uppercase), and {ip} (the visitor's IP address).
Choose the work mode from five options:
| Mode | What the visitor sees | Check and log |
|---|---|---|
| Automated: filter is enabled | The target site or the dummy site, depending on the result of the check | The check runs, and the result is written to the log according to the Visit log setting |
| Paused: always show dummy site | The dummy site, always | No check, and visits are not written to the log |
| Disabled: always show target site | The target site, always | No check, and visits are not written to the log |
| Training: always show dummy site | The dummy site, always | The check runs, and its actual result is written to the log |
| Training: always show target site | The target site, always | The check runs, and its actual result is written to the log |
Campaign work modes.
In the list, the counters count a visit as a dummy visit in the “Paused” mode, as a target visit in the “Disabled” mode, and by the actual result of the check in the “Training” modes.
Put the campaign file on your hosting in the “Training: always show target site” mode. Visitors see the target site, and the log shows whom the filter would have cut off. When you are happy with the picture, switch the campaign to “Automated”. You do not need to replace the file.
The Save and download file button is at the bottom of the sites block and at the end of the form, next to the Save settings button. For what to do with the file, see File for your hosting.
Additional parameters#
The sites block is followed by the “Additional settings” heading. The system warns you to leave these parameters at their defaults unless you know exactly what they affect. Here they are grouped by task, not in the order of the form.
Who to let in:
| Parameter | What it does |
|---|---|
| Traffic | The device type: “Any traffic”, “Mobile only”, “Desktop only”, “Mobile: only iOS”, or “Mobile: except iOS”. |
| Operating systems (OS), Browsers | The allowed systems and browsers. An empty list allows any known OS and any browser except bots. If a list is set and the visitor's system or browser is not in it, or is not recognized, the visit is filtered out. |
| IP version | “Receive traffic from any protocol”, “Receive IPv4 traffic only”, or “Receive IPv6 traffic only”. |
| Exclude countries | The countries you do not accept visits from. It works when the Countries list is empty. If countries are selected, only those countries get in. |
| Check language | Compares the language of the visitor's browser. If you select Countries, the language of any of those countries passes. If the Supported languages list is filled in, a language from that list passes. If there are no countries and no list, the check filters out nobody. A visitor with no language in the request header fails the check. |
| Supported languages list | Your own list of languages instead of the languages of the selected countries. |
| Forbidden languages list | Blocks visitors whose browser has any of these languages. It always works, even without the Check language checkbox and with an empty country list. |
Parameters for device, country, and language.
How to check:
| Parameter | What it does |
|---|---|
| Check only the main IP | Without the checkbox, all the addresses that came with the visit are checked: the direct one, the one from CloudFlare, and the ones from proxy headers, for example X-Forwarded-For. With the checkbox, only the one main address is checked and any proxies are ignored. |
| Check ad click ID | Lets in only the visits whose URL has a non-empty ad click ID. It checks that the ID is present, not that it is valid. For example, fbclid, gclid, gbraid, wbraid, ttclid, twclid, msclkid, yclid, and adclid all fit. For some traffic sources, we recommend turning the check on. |
| Filters set | Which black lists to apply. The “Default” lists are marked in green. If you select nothing, the default set works, and it fits almost every case. Choose your own set only when you understand why. Your own lists are described below. |
| Block traffic if URL contains | Words from the full address of the visit that get it filtered out. One word per line, and case does not matter. If a line has several words separated by commas, the visit is blocked only when the address contains all of them. |
| Pass traffic if URL contains | A white list of words in the address. A visit that matches none of the entries is filtered out. The format is the same. If both fields are filled in, this list is checked first. |
| IP white list | Addresses that are not checked and always see the target site. One address or network per line: 203.0.113.7, 203.0.113.0/24 (mask from 8 to 31). For IPv6, the mask is from 32 to 64. Enter your own address here to test the site. |
Parameters for how visits are checked.
When and how many:
| Parameter | What it does |
|---|---|
| Trash visits | The number of first visits that passed all the other checks but will be filtered out anyway. Useful for debugging. The number in the field decreases with each such visit. |
| Visit log | What to write to the log: “Log all visits”, “Log only target visits”, “Log only dummy visits”, or “Do not log visits”. All the campaign statistics are built from the log. |
| Weekdays, Timetable, Timezone | When the campaign lets traffic through. Select the days with the “Mo”–“Su” buttons (the links “all”, “no”, “wday”, and “wend” select several at once) and a time as “hours:minutes — hours:minutes”. If the start is later than the end, the window passes through midnight, for example 22:00–06:00. A start or an end of “00:00” counts as not set. Until you select a timezone, the network's timezone is used. A visit outside the timetable is filtered out. |
Parameters for the timetable, the log, and trash visits.
How a campaign checks a visit#
The campaign gives each visit one of two answers: the target site (all the checks passed) or the dummy site (one of them failed). A visit that gets the dummy site is logged with the reason, and you read the statistics by that reason. The checks run from top to bottom, and the first one that triggers becomes the reason.
| Check | Reason in the statistics | What you control |
|---|---|---|
| An address from the IP white list: the visit goes straight to the target site | — | IP white list |
Service requests (the site icon, robots.txt, script maps, and the like), bots, link preview services |
“Path”, “Trash”, “Bot”, and “Header” for a request without User-Agent | Always on |
| Device type, system, browser | “Device” | Traffic, Operating systems (OS), Browsers |
| IP version | “Protocol” | IP version |
| Language and country | “Language”, “Geo” | Countries, Exclude countries, Check language, the language lists |
| Ad click ID | “Ad ID” | Check ad click ID |
| Words in the address | “URL” | The two word lists |
| Black lists of addresses, networks, and IPv6 | “IP”, “IP net”, “IPv6” | Filters set, Check only the main IP |
| Black lists of request headers | “Header” | Filters set |
| Trash visits | “Trash” | Trash visits |
| Timetable | “Timetable” | Weekdays, Timetable, Timezone |
The order of the checks and the decline reasons.
Checks you have not set up filter out nobody. Bots and service requests are always cut off, and the black lists follow the default set.
Using a campaign#
File for your hosting
-
Download the file. In the campaign settings, click Save and download file, or click the download icon in the list row. You get an
index.phpfile with the current settings. -
Put it on your hosting. Place
index.phpwhere the main page of the site goes. The hosting must run PHP with the cURL extension. If you chose the “Open file with this name” method, put the files of the target site and the dummy site at the paths you specified. -
Test it. Add your own address to the IP white list, so you always see the target site. Then open the site from another address, for example from a phone over a mobile network, and compare the result with the log.
On every visit, the file sends the request data to the network's server and shows the answer. If the server does not answer, the visitor sees the dummy site. The addresses and the other settings are stored in the network, so if you change an address or a parameter, you do not need to replace the file. If you change the display method of the target site or the dummy site, download the file again.
The file has the address of the request to the network's server built in, and it contains your API key. Store the file the way you store a key, and do not publish its source text.
Connecting to a flow and a split test
You can connect a campaign to a flow, to a whole split test, and to a single variant of a split test.
-
Open the settings. For a flow, open Flows › Flows by offers, then click the flow name or the Settings button. For a split test, open its settings page.
-
Select a campaign. In the Cloak and filters block, open the Connect to traffic filter list and select a campaign. The list appears if you have at least one campaign, and it holds only your campaigns. In the split test variant window, use the Action and Campaign fields for this.
-
Check that it is saved. In a flow and in a split test, the setting is saved as soon as you select a campaign. In the variant window, click Save.
The campaign then checks each visit. A visit that passes goes on as usual, and a visit that is filtered out gets the trafback of the flow or the split test. Click reports mark it as “Ban: filters” (where you can see it). For the settings blocks themselves, see Cloak and filters of a flow, Filters for the whole split test, and Variant settings.
Only the checks and the work mode are used. The target site, the dummy site, and the display methods are not used. A visit that passes goes where the flow or the split test itself leads, and a visit that is filtered out gets its trafback. For what else changes in a flow when you select a campaign, see Filters and trafback. The “Paused” mode sends all traffic to the trafback, “Disabled” lets everyone through, and the “Training” modes work like “Automated”: the actual result of the check decides.
An agency has no flows, so it connects a campaign to a split test: Traffic › Split tests. The Connect to traffic filter list in the settings attaches the campaign to the whole test, and the Action and Campaign fields in the variant window attach it to a single variant. A link from the Link generator is not checked by a campaign. The campaign file works for an agency too. The campaign list, statistics, black lists, and white sites open the same way as for an affiliate, in the Traffic group.
Mini-tracker: campaign postbacks#
At the end of the campaign settings is the Postbacks block with four URLs that count the leads of your campaign. Put them into your tracker or another service that learns about leads. When the status of a lead changes, the service calls the matching URL, and the campaign counts new, approved, and cancelled leads and the earnings. The campaign list calculates CR, EPC, and “Approve” from these numbers. Only the counts are kept: there are no statistics for individual leads.
| Event | URL ending | What grows in the list |
|---|---|---|
| New leads | status=new |
“Leads arrived” |
| Approved leads | status=approve |
“Leads approved” |
| Approved leads with price | status=approve&payout={payout} |
“Leads approved” and “Money earned” |
| Cancelled leads | status=cancel |
“Leads cancelled” |
Campaign postback URLs.
The full URL is shown below. Replace {payout} with your tracker's macro for the payout amount.
https://lk.dalead.pro/api/filter/postback.json?id={token}&uid=<campaign number>&status=newIn your settings, the campaign number and your key are already filled in, so copy the URLs from the block.
Campaign statistics#
Three pages show the campaign statistics. They are built from the visit log, so with the “Do not log visits” setting they are empty, and with “Log only target visits” they do not show the visits that were filtered out. The log is kept for a limited time, and the network sets the period. Open the pages with the Statistics tiles under the campaign list. Open the log of a single campaign with the Statistics button in its row.
 1234
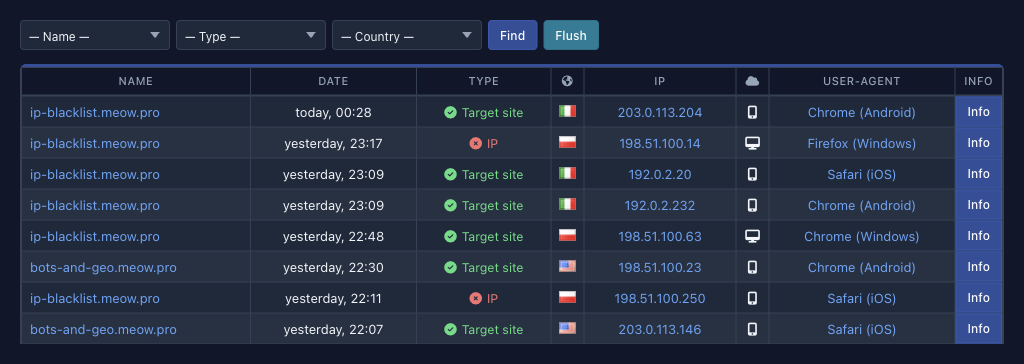
Visit log. A row is one visit: the campaign, date, type, country, IP address, device, and User-Agent. The type is “Target site” or a decline reason, and a tooltip shows the full name of the reason. Click a campaign, type, country, IP address, or User-Agent to keep only such visits. The lists above the table set the same selection: campaign, Type (“Target site”, “Dummy site”, or one of the reasons), and country. The Info button opens a window with the reason, the list that triggered it (if the reason is a list), the country, User-Agent, system, browser, all the addresses that came with the visit, and the recorded request headers. The Flush button deletes the visits that match the current selection.
Statistics by dates and by sites count the visits for a period, the last seven days by default. Set the dates and click Show, or select a preset period with a button (“Week” and “Month”, and also “Today” and “Yesterday” in the by-sites statistics). In the first table, a row is a day. In the second, a row is a campaign (this section calls a campaign a site). Each row shows the number of visits, the target and filtered-out visits in numbers and percentages, and a column for each of the fourteen decline reasons: the number of visits, with the share in a tooltip. The reasons are named in How a campaign checks a visit.
Your own black lists#
A black list is a set of addresses or rules for request headers. A campaign filters out a visit if it matches one of the lists the campaign uses. The network keeps some of the lists, and you create your own. Open them with the My filters tile under the campaign list.
List types
| Type | What the list holds | Entry |
|---|---|---|
| IP addresses | Single IPv4 addresses | Address |
| IP networks | IPv4 networks | Address and mask length from 8 to 31 |
| IPv6 networks | IPv6 addresses and networks | Address and mask length from 32 to 64 |
| Headers | Rules for request headers | Text, header, comparison method, and rule |
Black list types.
Only public addresses go into the lists. Private and reserved addresses are rejected. To create a list, enter a name, select a type, and click Add above the table.
The list table has the columns Name, Status, Default, Type, Size, Updated, and Action. Click a value in the Status and Default columns to switch it: “Active” or “Hidden”. A hidden list cannot be selected in a campaign. A list marked “Default” works in every campaign where you have not selected the filters set manually. The Updated column shows “Manual” or the time of the last update of a list that is loaded from a URL (“Never” until the first update). The View button opens the entries, Settings opens the name, the active flag, and the automatic updates, and Delete erases the list together with its entries.
List entries
In an open list, add an entry with the field and the Add button above the table. Search and the selection by comment help you find an entry. The comment (“Public list”, “Suspicious”, “Corporate”, “Different User-Agent”, “GEO error”, “Header error”, “Multiple errors”, “Bad request”, “Bot”) is just your note and does not affect filtering. The Expires column shows how much time is left until the entry expires, and it is empty for entries without an expiry. Each entry has Settings and Delete buttons.
An entry in a headers list has five parts:
- Text — the value to look for, up to 250 characters.
- Type — the request header, for example
User-Agent,Accept-Language, orReferer. - comparison — “Text” (the value is searched for in the header as a substring, ignoring case) or RegExp (a full PCRE regular expression with delimiters and modifiers, for example
/iphone|android/i). Without delimiters, the rule does not trigger. - rule — “Black list” blocks the visit if the header matches, and “White list” (the WL button) blocks it if the header does not match or is not sent.
- comment.
Import and export
Under the entries table are a field for choosing a file and the Import, Export, and Flush buttons. The file is a CSV in UTF-8 with no header row. The separator is detected automatically and can be a comma, a semicolon, or a tab. Import adds new entries and updates matching ones without deleting anything, and when it finishes it reports how many entries were added, updated, and rejected. Rows that cannot be read and non-public addresses are rejected. Export gives you a file in the same format, so the easiest way to make a template is to add one entry by hand, export the list, and build the template from the file. The Flush button deletes all the entries of the list.
| List type | Columns of a row |
|---|---|
| IP addresses | address, comment, expiry |
| IP networks | address, mask length, comment, expiry |
| IPv6 networks | address, mask length, comment, expiry |
| Headers | quoted value, header type number, RegExp (0 or 1), comment, expiry, white rule (0 or 1) |
CSV row format.
The comment and the expiry are written as numbers. The value 0 means “no comment” and “no expiry”. The comment is a number from the list above, in order, from 1 (“Public list”) to 9 (“Bot”). The expiry is the end time of the entry as a Unix timestamp. When that time passes, the entry is deleted. Header types are set by numbers, for example 1 for User-Agent, 2 for Accept, 5 for Accept-Language, and 23 for Referer.
Updating from a URL
You can keep a list as a copy of a file on a website. In the list settings, select the Enable automatic list updates checkbox and set the Update period and the File address. The address is a public http or https link to a CSV in the format of this list type, on port 80 or 443, with no login and password in the link, up to 500 characters. You can put a key in the link itself, and only you see it. The period is from three hours to a week.
A mirrored list repeats the file. Entries that are not in the file are deleted every time the file changes, manual edits disappear, and you cannot edit the list by hand while automatic updates are on. The file can be up to 8 MB and 200,000 rows (500 in a headers list), and you can turn automatic updates on for no more than five lists. If an update fails, the Updated column shows the number of failures in a row in red.
How lists get into campaigns
You see your active lists in the Filters set field of every campaign, together with the network's lists. You can select them manually. If you select nothing, the “Default” lists work. Your own list of addresses or networks marked “Default” is also connected to the simple Black lists filter in your flows and split tests. Headers lists work only in campaigns.
White sites#
A white site is a small site stored on the network's server. When a flow or a split test filters out a visit, it can show this site instead of the trafback link. In the campaign itself, the dummy site is set by an address or a file. You select a white site from the storage in a flow or a split test, in the White site list of the Cloak and filters block.
 12345
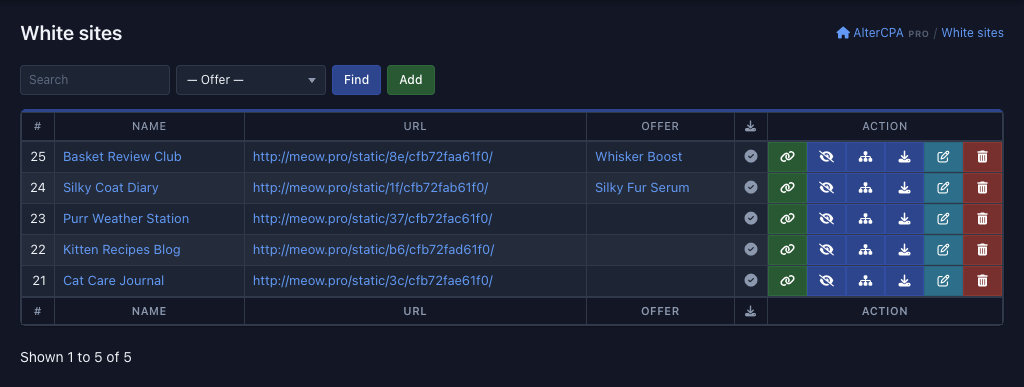
The table has the number, name, site address, offer, download state icon, and buttons. Above the table are a search by name, a list of offers, and the Add button.
-
Click Add. The Settings window opens.
-
Fill in the fields. Name is required. In the Offer list, you can link the site to an offer, and “— not linked —” is selected by default. In the File field, attach the site as a ZIP archive, and in the URL field, enter a link to a site that the system downloads itself. Leave both empty to build the site in the file manager.
-
Click Save. The site appears in the list but is hidden.
-
Show the site. Click the Hide / show icon in the row. While the site is hidden, you cannot select it in flows and split tests.
The archive must contain an index.html file in the root folder. Archives cannot contain script files or executable files: php, phtml, py, sh, exe, htaccess, and the like. The network limits the size of a site, the number of sites, and the total storage. If something is wrong, the form answers with one of these errors: “site archive is damaged or has incorrect format”, “site archive has files of forbidden type”, “site archive is too large”, “too many white sites created”, or “white site storage ran out of capacity”.
Linking to an offer narrows the choice. In a flow or a split test, you see the white sites that have no link and the sites linked to the offer of that flow.
If you entered a link, the site is downloaded in the background, and the icon in the Site download process column shows the progress: “No download required”, “Waiting in line to download”, “The site is downloading”, “Site downloaded successfully”, or “Error downloading site”.
| Row button | What it does |
|---|---|
| Link icon | Opens the site for viewing. |
| Hide / show | Turns the site on or off for selection in flows and split tests. |
| File manager | Opens the files of the site. You can upload files, create a file or a folder, and download, edit, and delete a file. |
| Download | Gives you the whole site as a ZIP archive. |
| Edit | Opens a window with the name, offer, archive, and link. An archive uploaded here updates the files of the site. |
| Delete | Erases the site. |
White site buttons.