On this page
Everything about your account is on the Profile page: your name, email and contacts, the interface language, your password, two-factor authentication, and the API key. To open it, click your name in the top right corner. The menu under the name has Profile, Finance, and Log out. Next to your name is the Help link — your correspondence with the network's support. The main menu may also have a News item.
Registration#
You either create an affiliate account yourself on the network's page or get one from the network. The Register button appears on the login page only if the network has not closed registration. In some networks, a personal manager creates your account. Contact the manager to register.
How to register
-
Open the form On your network's login page, click Register or open the registration page.
-
Fill in the fields Enter Your name (at least 4 characters), E-mail, and Password (at least 8 characters). Your email becomes your login, so enter a working address that no other account uses. If the network asks for contacts, such as Telegram, fill those in too. If the network has reCAPTCHA turned on, complete it.
-
Submit the form Click Register. You are logged in to the new account right away. Some networks then require manual activation by a personal manager.
If the form comes back with a message, the message names the reason:
| Message | What happened |
|---|---|
| E-mail is taken or entered incorrectly | The address has a typo or is already in the network. If you already have an account, log in or recover your password. |
| Password is too short | The password has fewer than 8 characters. |
| User name is too short | The name has fewer than 4 characters. |
| Fill in your contact details | The network requires contacts at registration, and none are filled in. |
| Google said you are bot, sorry :( | The reCAPTCHA check failed. Refresh the page and try again. |
| Internal error while registering | The account was not created. Try again later. If the error persists, contact the network. |
Some networks review new affiliates manually. Then, instead of your account, you see the message “Awaiting account activation”. A manager will contact you, and once your account is activated, you get access.
Profile#
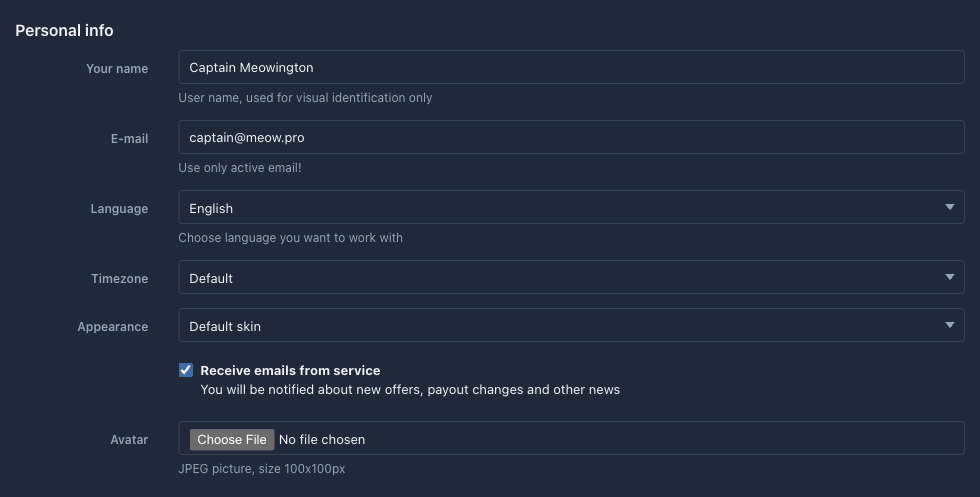
The Profile page has a form with the sections “Personal info”, “Access settings”, and “API-interface”, and a “Two-factor authentication” block below it. The API key and two-factor authentication have their own sections below. This section covers the other fields, including the password.
 12345
Every network has these basic fields:
| Field | What it does |
|---|---|
| Your name | The name shown next to your avatar. It only identifies you and can be any word. Required. If you leave it empty, the profile is not saved and the message “Error: you forgot to set your name” appears. |
| Your login and the address for the network's emails. If another account already uses the address, it does not change, and the other fields are still saved. | |
| Language | The interface language. The value “— auto —” picks the language for you, based on the network's setting or your browser's language. The list of languages depends on the network. This help also opens in the language you select here, if it is Russian or English. |
| Receive emails from service | A checkbox to receive the network's emails: new offers, commission changes, and other news. |
| Avatar | A JPEG file. The picture is resized to 100×100 px. To remove it, select Remove existing avatar (it appears while an avatar is uploaded) and save the form. |
| Password and Confirmation | A new password for logging in: type it in both fields. If the fields are empty, or the confirmation does not match the password, the password stays as it was and there is no error: the other fields are saved and the cabinet says “Profile saved.” The cabinet does not check the length of the new password. The minimum of 8 characters applies only at registration. |
Basic profile fields
Additional fields appear only if the network has turned them on:
| Field | What it does |
|---|---|
| Timezone | Appears if the network has enabled personal timezones. Dates and times show in the timezone you select, and the value “Default” keeps the one set by the network or your team. |
| Appearance | Appears if the network offers several themes, such as a dark one. The choice is saved with your account. |
| Contacts, such as Telegram and WhatsApp | The network decides which fields there are. If the network requires at least one contact and none is filled in, you are returned to the profile with the message “Please enter at least one contact”. Agencies skip this check. |
Additional profile fields
Click Save under the last field of the form, below API token. The page reloads with the message “Profile saved.” If you changed your password, the current browser stays logged in, but your other sessions, in other browsers and on other devices, end, and you need to log in there again. If you changed only your email, the session ends in this browser too. Log in again with the new address.
Two-factor authentication#
Two-factor authentication adds a second step to your password. After you enter your email and password, you are prompted for a one-time code from an app on your phone. Google Authenticator (iOS and Android) works, and so does any app that supports TOTP, time-based one-time codes. The code has six digits and changes every 30 seconds. It secures logging in to your account. It does not secure the API key, see API key.
How to enable
-
Install the app Install a one-time code app on your phone and check that it runs.
-
Find the security block Open Profile and scroll down, below the form. The Two-factor authentication block shows the status (“Disabled”) and the Enable two-factor authentication button.
-
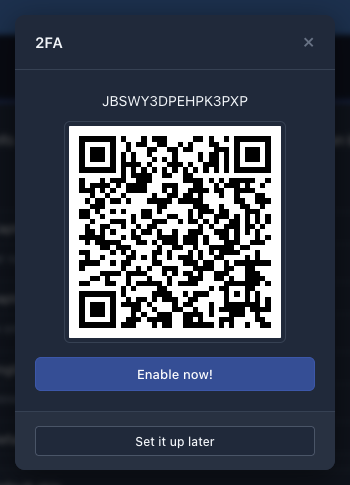
Open the setup window Click the button. The “2FA” window opens with a key written in letters and digits, and a QR code.
-
Add the account to the app Scan the QR code. If you cannot scan it, enter the key from the window by hand, and when the app asks for the key type, select “time-based”. An entry appears in the app with the network's name and your email, with a six-digit code under it.
-
Confirm Make sure the code is visible in the app and click Enable now!. The browser asks once more whether the app is ready and warns you not to turn on two-factor authentication unless the code is visible. Confirm. The Set it up later button closes the window without changing anything.
-
Enter the first code Right after you turn it on, you are asked for a code. Enter the current code from the app. In that block, the status changes to “Active”.
 1234
The platform does not check the code when you turn it on — clicking Enable now! is enough. If the app is not set up, you cannot log in, and the password recovery link does not help. See No access to the app.
Login with a code
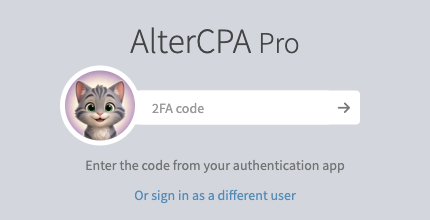
After your email and password, a screen with the “2FA code” field and the hint “Enter the code from your authentication app” opens instead of your account. Type the six digits in a row, with no space, and click the arrow to the right of the field. The platform remembers that you entered the code for the rest of the session in this browser and does not ask again.
 1
If the code is rejected, wait for the app to show the next one and enter that. The network accepts a code within a small time tolerance, but if your phone's clock is noticeably fast or slow, the code fails. Turn on automatic time on your phone.
How to disable
Open Profile, click the red Disable two-factor authentication button in the Two-factor authentication block, and confirm the question “Are you sure you want to disable two-factor authentication?” You do not need to enter a code separately: you already logged in with one. If you turn it on again later, the setup window shows the same key and QR code as before, so you do not need to delete the entry in the app or create it again.
No access to the app
If you lose your phone or delete the app along with the key, you cannot log in with a password alone, and the password recovery link does not replace the code. The network's Administrator can turn off two-factor authentication for your account. The “Help” page is locked without the code too, so contact the network outside your account, in whatever way you usually reach it.
API key#
The API lets your own scripts and services work with the network. The API key tells the platform who a request comes from. Requests carry a token — your account number and the key joined by a hyphen, in the form {user}-{key}.
-
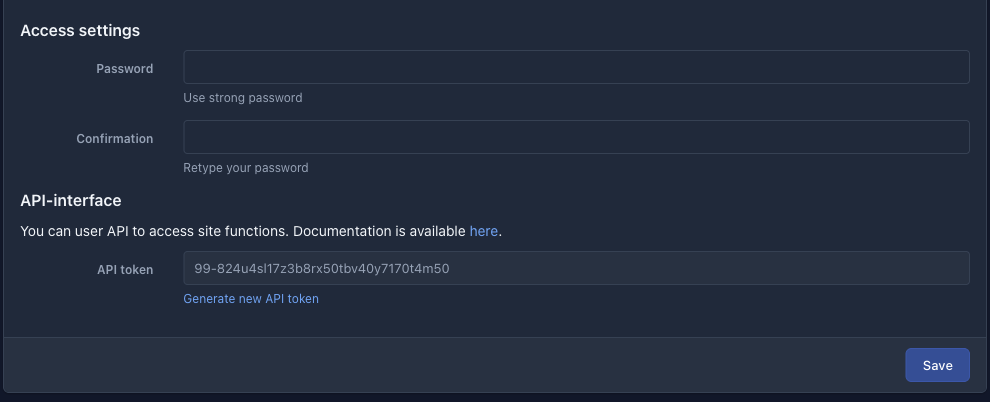
Open your profile Go to the Profile page and find the API-interface heading above the Save button.
-
Copy the token The API token field holds the whole token. The field is read-only: you can select and copy the text, but not change it.
-
Put the token in the request Pass the token in the
idparameter of every request. For how to build a request and what the platform replies, see Address, token, and responses.
 1234
Reset the key
If the token ended up somewhere it should not be, or you want to change it, click the Generate new API token link below the token field. The browser asks “Do you really want to reset the key?” After you confirm, the page reloads with the message “Profile saved.” and the token field holds a new key. Your account number does not change.
- The old token stops working at once: requests with it get the error
key. Replace the token everywhere you entered it: in scripts, on sites, and in third-party services. - The link takes effect immediately, without the Save button. If you edited other fields of the form, save them before the reset, or the changes are lost.
News#
The News item in the main menu opens the network's news feed: new offers, changes to terms, new GEOs, offer sites. Each news item has a title, a date, a section, the offer it relates to, and a teaser. The Read the whole news link appears on items that have a full text and opens it. The Comments link appears if the network has turned on comments, and it leads to the comments below the news item.
Help: support tickets#
The Help link in the top bar opens the network's support page. This is your correspondence with the network's staff, not this help.
-
Create a ticket On the Help page, click New ticket. In the window, enter the subject in the “Ticket subject” field and the text in the “Message text...” field, then click Create.
-
Wait for a reply The ticket opens as a conversation. If a reply stays unread for more than 10 minutes, the platform emails you about it.
-
Continue the conversation Write in the “Message text...” field at the bottom of the page and click Send message. An icon next to a message shows whether it has been read.
-
Close the ticket When the question is solved, click Mark closed in the ticket's row on the Help page and confirm.
In the list, each ticket has a number, a title, a status, and the last message with the author's name. The status “Waiting” means you wrote last and the network has not replied yet. “Answered” means the network replied, and “Closed” means the ticket is closed. The Active tab shows everything except closed tickets, and the Archive tab shows the closed ones.
A request for access to a closed offer also goes to support. For details, see Access to an offer.
If a section is missing from the menu#
The network can hide some sections of your personal account, for example News, the Offers page, or individual reports. If your menu lacks a section that this help describes, the network does not show it. The “Profile” page and the “Help” link are always there.