On this page
A parked domain is your own domain or subdomain that you point to the network's server. You can open flow and split test links on it instead of on the network's address. If you glue the domain to a flow or split test, the chosen flow opens on the domain's home page. You can work without your own domains, but separate domains are more convenient, so we recommend using them.
You work with domains on two pages of the Flows section (for agencies the section is called Traffic):
- Parked domains — add a domain, check its status, glue it to a flow or split test, set the default domains.
- Domain confirmation — the files that ad networks ask you to place on a domain.
How to park a domain#
-
Add the domain to the system
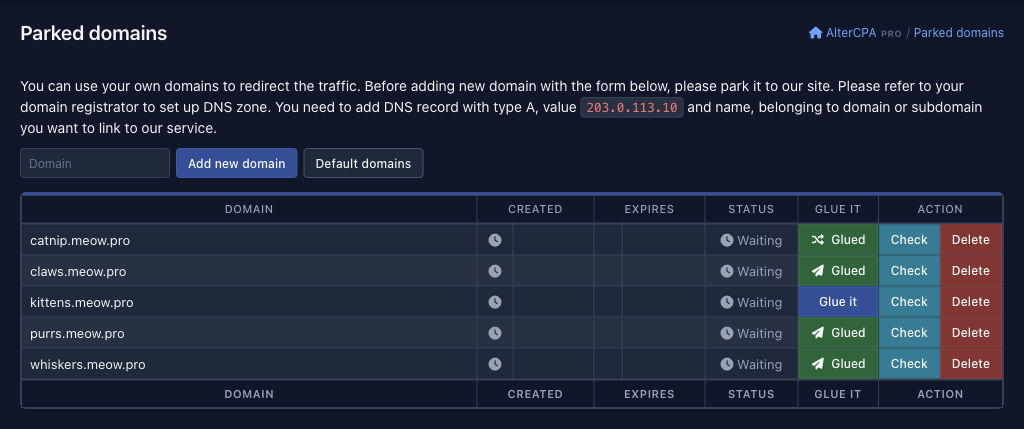
Open the Parked domains page, enter the domain in the Domain field and click Add new domain. Enter the name only, for example
purrs.meow.pro. You don't needwwworhttp://. If you paste a full address, the system takes the domain name from it and drops the leadingwww.. Domains with non-Latin letters work too. The new domain appears in the table with the status Waiting. If the page shows “Error occurred” instead, the name is invalid, it is an IP address, or the domain is already in your list. -
Set the domain's DNS servers
Do this in your registrar's account. In the domain settings, choose the DNS servers where you will edit the DNS zone. Usually these are the registrar's own free DNS servers. If the registrar doesn't offer them, use CloudFlare.
-
Set up the domain's DNS zone
Do this at the registrar or in CloudFlare too. Open the DNS zone editor (not the DNS server settings) and do the following:
- Delete all A, AAAA and CNAME records for your domain or subdomain.
- Add one A record whose value is the network's IP address. The address is in the text above the form on the Parked domains page.
- Don't create records for the
wwwsubdomain, because it is not supported.
-
Wait for the domain to be picked up
DNS changes don't reach the network at once. It takes from a few minutes to three days. The platform checks a new domain on its own soon, and you can start a check with the Check button. When Working appears in the Status column, the domain is ready.
In an A record, the name depends on the domain. For a root domain it is @ (some registrars use the full domain name instead). For a subdomain it is the subdomain's name without the rest of the domain name:
| Domain in the list | Type | Record name | Value |
|---|---|---|---|
meow.pro |
A | @ |
the IP address from the text above the form |
purrs.meow.pro |
A | purrs |
the same IP address |
Example A records for a root domain and for a subdomain.
 12345
Domain status and check#
The table shows each domain with the result of its last check.
| Column | What it shows |
|---|---|
| Domain | The domain name. A lock icon before the name means HTTPS works for the domain |
| Icon before the date | The state of the domain at the registrar. The tooltip says “No information”, “Delegated” or “Got some problems” |
| Created | The registration date of the domain |
| Number before the expiry date | How many days are left until the registration ends. The number is red when fewer than 30 days are left, yellow for 30 to 60, and green for more than 60 |
| Expires | The date the registration ends |
| Status | The result of the last check: Waiting, Working or Error. The tooltip shows the time of the check |
| Glue it / Glued | Gluing the domain to a flow or split test, see below. The column is there if you have already created at least one flow or split test |
| Action | The Check and Delete buttons |
Columns of the parked domains table.
Start working with traffic once the domain's status is Working. Until the domain responds to the platform, links on it won't open.
The registration date, the expiry date and the state icon come from the registrar. They are filled in after the domain starts working, and only some domain zones support them. They are for reference and don't affect how the domain works. Empty fields and a missing green icon are not an error.
How a domain is checked
The platform opens your domain over HTTP and waits for a response. If it answers, the domain becomes Working. Then the platform checks HTTPS the same way. If that succeeds, a lock icon appears before the domain name, and flow links on this domain are built with https://. If the domain doesn't answer, the status becomes Error.
The platform checks domains on its own, but it rechecks a domain that has already been checked only about every 12 hours. So after any DNS change, click Check yourself. The result of a check is remembered for 10 minutes, so there is no point in clicking more often. After you click, the page shows the message “Success” (the domain responds) or “Error occurred” (it doesn't).
The status Error right after you add a domain usually means DNS hasn't updated yet. If the status doesn't go away, check the following:
- The A record points to the IP address from the text on the page, and no old A, AAAA or CNAME records are left for this name. A forgotten AAAA record is an easy trap: if someone else's server answers at its IPv6 address, the check fails.
- The domain uses the DNS servers where you edited the zone.
- If you work through CloudFlare, the right mode is on, see below.
If a domain that was already Working stays in the status Error for 30 days in a row, the platform removes it from the list on its own. The glue and the confirmation files go with it.
Gluing a domain#
You can glue a parked domain to one of your flows or split tests. Then the chosen flow or split test opens on the home page of the domain. A domain can be glued to only one flow or split test, but you can glue any number of domains to a flow or split test. You can glue only your own domain. The network's shared domains don't work for this. The glue takes effect when the domain becomes Working.
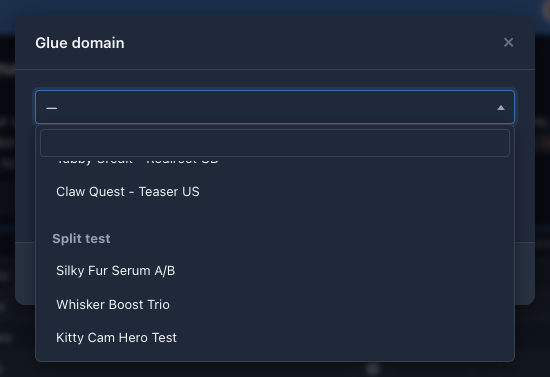
Agencies have no flows, so a domain is glued to a split test only. The glue column on the Parked domains page appears when you create the first split test and disappears with the last one. The list in the Glue domain window has one group, “Split test”. You can also glue a domain in the split test settings: Domain.
From the domain list
-
Click Glue it in the row of the domain. The Glue domain window opens.
-
Select a flow or split test from the list. Flows and split tests are in separate groups.
-
Click Glue it. In the domain's row, the button turns green and gets the label Glued. The domain itself picks up the settings within 10 minutes.
 1
To unglue a domain, open the same window with the Glued button, select the empty item “—” and click Glue it. To reassign the domain, select a different flow or split test in the window.
From the settings of a flow or split test
In the flow settings (see Link types), select the domain in the Domain field. Next to it, under the label “Glue to flow”, there is a button. A split test works the same way, with the label “Glue to split” (link setup). The glue is applied as soon as you click the button, while the domain you choose for the link is saved with the other settings. The label on the button depends on the domain:
| Label | What it means |
|---|---|
| Glue domain | The domain is free. Click the button to glue the domain to this flow (split test). The button is inactive if the default domain or a shared domain of the network is selected |
| Domain glued | The domain is already glued here. Click the button and confirm “Unglue thus domain?” to remove the glue |
| Glued elsewhere | The domain is glued to another flow or split test. Click the button and confirm “Unglue domain and glue to this link?” to move the glue here |
States of the glue button in the settings of a flow and a split test.
Gluing and ungluing take effect within 10 minutes, not at once.
Deleting a flow or split test doesn't remove the glue: the domain keeps leading to the deleted object. Unglue the domain first or reassign it to another flow.
Default domains#
The Default domains button next to the add form opens a page with three lists. In each list you can select one of your domains, a shared domain of the network (if the network provides them) or the empty item “—”. After you select, click Save.
| List | What it is used for |
|---|---|
| Redirect domains | The domain for the links of your flows and split tests that have “use default domain” selected in the Domain field |
| Landing domains | The domain where landing preview links open, in the flow settings and in the offer card |
| Prelanding domains | The same for prelandings |
Default domains.
If the network has turned off parked domains in flows, the default domains page is closed, and the flow settings have no Domain field and no glue button.
Deleting a domain#
The Delete button in a domain's row removes the domain from the list after you confirm. The domain is also removed from all flows and split tests where it was selected or glued. In them, the Domain field goes back to “use default domain”. The confirmation files of this domain are deleted.
Domain confirmation#
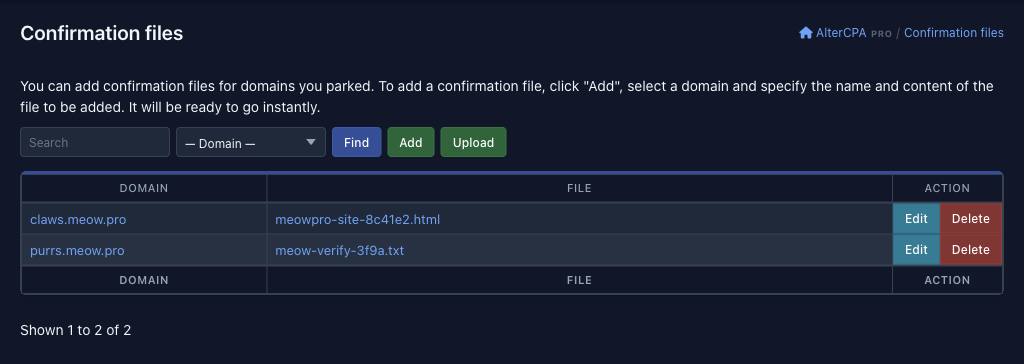
Some ad networks ask you to prove that the domain is yours before you start. You place a file with a given name and content in the root of the domain. On the Domain confirmation page (the page heading is “Confirmation files”), you create such files for your parked domains. The file is served at http://domain/file-name and, as the page says, is ready to use right after you save it. For that, the domain must already lead to the network's server. If you have no domains yet, the page shows a message asking you to park a domain first.
 1234
Create a file manually
Use this when the ad network gave you the file name and its content.
-
Click Add.
-
In the Domain list, select the domain the file is for.
-
In the File field, enter the full file name with the extension, for example
meow-verify-3f9a.txt. -
In the Code field, paste the content, for example
meow-verification=3f9a27c1d5e84b60. -
Click Create. The file appears in the list.
Upload a ready file
Use this when the ad network gave you a file to download.
-
Click Upload.
-
In the Domain list, select the domain the file is for.
-
In the File field, select the file on your computer and click Upload.
The file is created with the same name as the file on your computer (subject to the rules below), and its text becomes the content.
Check, edit or delete a file
- The file name in the list is a link. It opens
http://domain/file-namein a new tab, so you see the same thing the ad network will see. The domain name in the row is a link to a filter: only the files of this domain remain. - Edit opens the Code field with the current content. Change it and click Save. You can't change the file name. Delete the file and create a new one.
- Delete removes the file after you confirm.
- To find a file, enter part of the file name or of the domain in the Search field and click Find. There are 50 files per page.
File rules
| What | Rule |
|---|---|
| Extension | txt, html or json. The server serves the file with the matching type: text/plain, text/html or application/json |
| Name | Latin letters, digits, hyphen, underscore and dot. The system converts everything else to an allowed form: letters become lowercase, Cyrillic is transliterated, spaces are replaced with hyphens, and other characters (including /) are dropped |
| Duplicates | One domain can't have two files with the same name |
| Location | The root of the domain only. Nested folders are not supported |
| Forbidden names | robots.txt, humans.txt, manifest.json |
| Content | Not empty. Any PHP code is cut out of the content |
What you can add as a confirmation file.
The name is saved in lowercase, and the letter case in the address is ignored when the file is requested. So if an ad network asks for a file with capital letters in its name, the file still opens at the address the network uses. If you break one of the rules, the page shows only “Error occurred”, with no reason. Check your file against the table.
Parking through CloudFlare#
CloudFlare is a free DNS service that is handy for parking domains if your registrar has no DNS servers of its own. There are two ways to set it up, and the preparation is the same.
-
Sign up for CloudFlare
You don't need a paid or extended subscription.
-
Add the domain to CloudFlare
In your CloudFlare account, open the Domains section, click Onboard a domain and select the free plan.
-
Set the CloudFlare DNS servers at the registrar
After you add the domain, CloudFlare offers to change the domain's DNS servers to its own. Do this in your registrar's account.
-
Set up the DNS zone
Open the DNS zone editor in your CloudFlare account and do the same as in the third step of parking. Delete the old A, AAAA and CNAME records for the domain and add an A record with the network's IP address. You don't need records for
www.
CloudFlare as a DNS server
In this mode CloudFlare only stores the DNS records, and the domain leads straight to the network's server. In the list of DNS records, the A record you added must have the DNS only mode (a gray cloud with an arrow going around it), not Proxied. You don't need to set up anything else.
CloudFlare as a full proxy
In this mode all the traffic of the domain goes through CloudFlare, so you must turn off page caching.
-
Turn on proxying for the record
The A record must have the Proxied mode (an orange cloud with an arrow going through it), not DNS only.
-
Set up encryption
In the SSL/TLS section of the domain settings, set the following:
- SSL: Custom - Flexible. This is very important!
- Always use HTTPS: On (if you need HTTPS support).
- Automatic HTTPS Rewrites: On (if you need HTTPS support).
-
Leave the rest as it is
You don't need to change other settings.