On this page
You start by choosing an offer. This is what you send traffic to. All the offers you can see are in the catalog: the Offers › All offers menu. The catalog shows payments by country or goal and the main metrics. The offer page shows everything else: goods, hold, allowed sources, landings and promotional materials.
You can get the same data from your own scripts. The functions of the offer app are described on the page API: offers.
From choosing an offer to traffic#
-
Find an offer. Open Offers › All offers, choose a category in the menu, or set a search and filters: Search and filters.
-
Read the terms. Click More about offer. The offer page shows the payments, hold, traffic sources and landings: Offer page.
-
Get access. If the Request access to offer button appears instead of Create new flow, you must get access to the offer first: Access to an offer.
-
Create a flow. A flow is your link to the offer. You send traffic through it: Getting started with an offer.
-
Get the materials. You can open landings for a preview or download them as a ready-made archive. Download the offer's banners and videos from the promotional materials: Landings and prelandings, Promotional materials.
An agency does not create flows, so it has no step 4. It uses the link generator and sends leads manually instead: Getting started with an offer.
What the catalog shows#
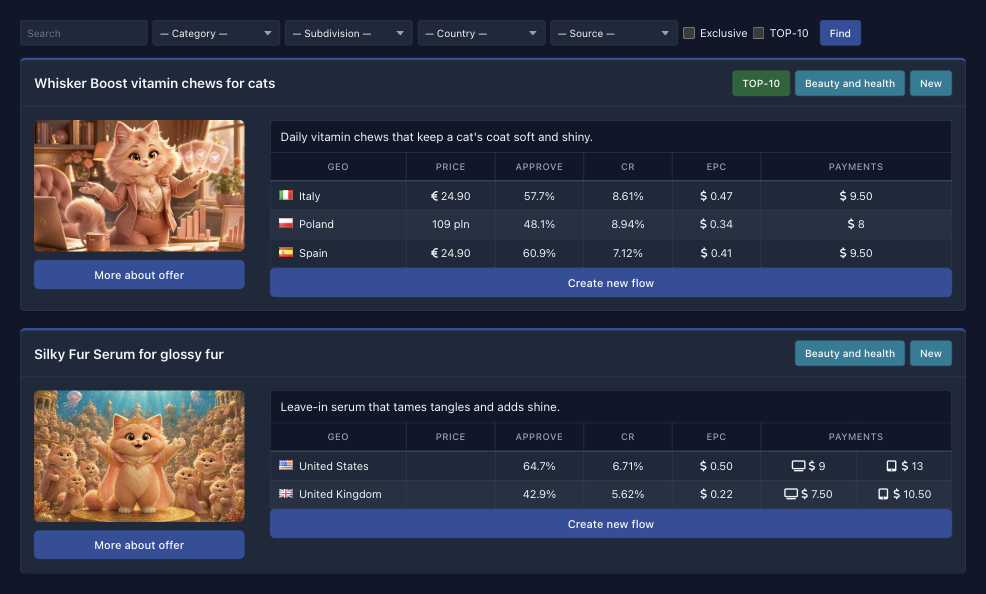
The catalog is a list of offers, and each offer has its own block. On the left of a block are the offer's picture and the More about offer button. On the right are the table of terms and an action button. The block heading holds the offer's name and links to its category and subcategory. It also holds the Exclusive and TOP-10 tags if the offer has them. Click a category or a tag to turn on the matching filter.
 1234
The action button under the table depends on your access:
- Create new flow — you have access to the offer.
- Request access to offer — you have no access, see Access to an offer.
- Send lead manually — only for an agency, and only on an offer that accepts leads via API, see Getting started with an offer.
Main columns
Each row of the table of terms is a country or a goal of the offer. If an offer has both goals and countries, the goals are separate heading rows, and the countries are listed under each goal.
| Column | What it shows |
|---|---|
| GEO | Country. If the offer pays for goals with no country attached, the column is called “Goals” and the rows hold goals. |
| Price | Price on the landing in the country's currency. For a goal, the goal's price, if one is set. |
| Approve | Percentage of confirmed leads: Metrics. |
| CR | Click-to-lead conversion: Metrics. |
| EPC | Average earnings per click: Metrics. |
| Payments | What the network pays you for one lead: Payments. |
Main columns of the table of terms.
The network can turn off any column, so you may not see all of them. If the offer has no clicks and orders in the statistics period yet, Approve, CR and EPC stay empty.
Additional columns
Not every network has these columns. They are typical of dropshipping offers.
| Column | What it shows |
|---|---|
| Min. price | The lowest price of an item that you can enter in a flow, if the offer lets you change prices. The flow does not save a value below the minimum. |
| Cost | The cost of the item in this country. Part of the Payments value can be a percentage of the cost: Payments. |
Additional columns of the table of terms.
Search and filters#
The Offers menu has the All offers item and the categories. Only categories that contain offers appear in the menu. Click a category in the menu to open the catalog with that filter. If the category has a description, it appears above the list.
The filter panel is above the list of offers. On a narrow screen it is collapsed under the Filter button.
| Element | How it works |
|---|---|
| Search | Looks for part of a word in the short or full name of the offer. If you enter several words, the name must contain all of them. A query shorter than two characters is ignored. |
| Category | Only offers of the selected category. |
| Subdivision | Only offers of the subcategory. The field appears if the network keeps subcategories. |
| Country | Offers that include this country in their list of countries. |
| Source | Offers where this traffic source is allowed. The field appears if the network keeps a list of sources. |
| Exclusive | Checkbox: only exclusive offers. |
| TOP-10 | Checkbox: only offers with the “TOP-10” tag. |
Catalog filter panel.
Set the conditions and click Find. The conditions work together, so an offer must match all of them. While a filter is on, the Reset button appears next to it. The drop-down lists hold only the values that have offers. If nothing is found, the catalog says “No offers found”.
The network can also turn on a simplified list. There, each offer takes one row with the picture, name, category, CR, EPC and approve, the country with its price (or the number of countries, if there are several), the payments and the buttons. A row has no tables by country and goal. They are on the offer page. The simplified list has no short description and no filter by source either, and the buttons in a row have shorter labels: More, Add (create a flow), Send (send a lead manually) and Request.
Offer page#
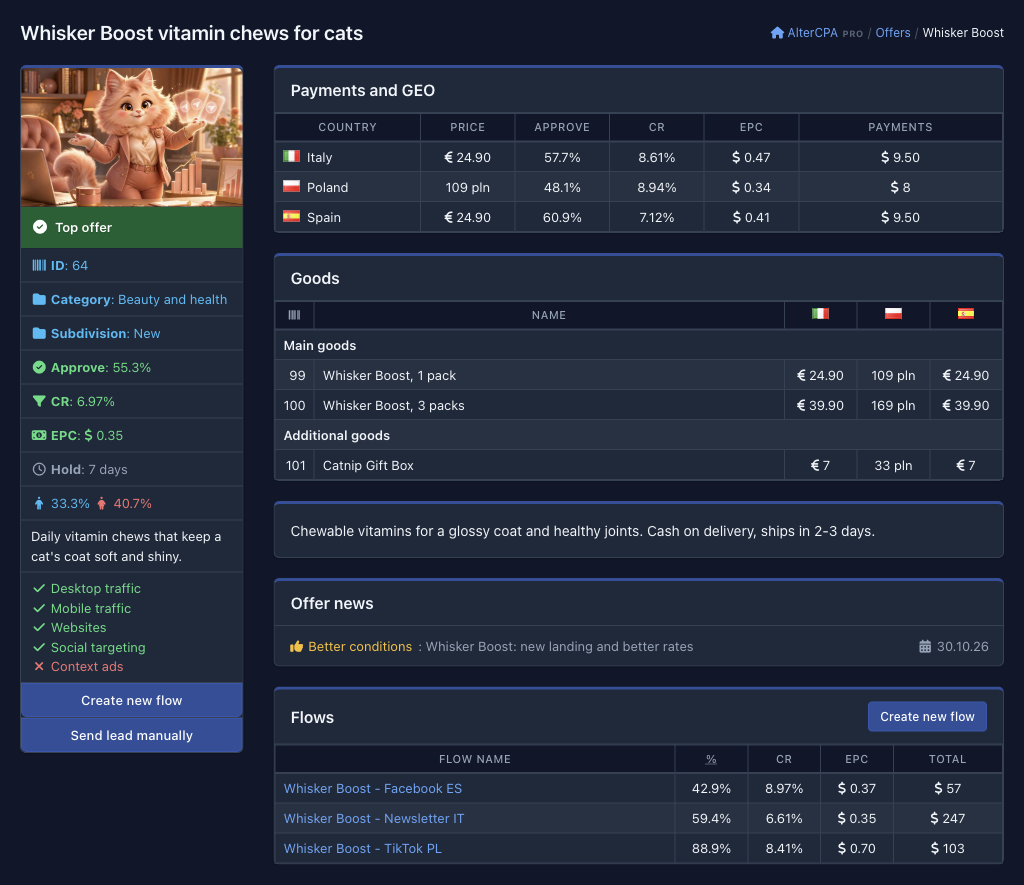
Click More about offer to open the offer page. The left side holds the details of the offer, and the right side holds the blocks with the terms.
 123
On the left:
- The offer's picture. Under it are the “Exclusive offer” and “Top offer” tags, if the offer has them.
- The offer ID. You need it in the API, and it is also in the page address, for example
/offers/64. - Category and subcategory.
- Approve, CR and EPC, when they have a value and the network shows them: Metrics.
- Hold — how long the commission is held back: Hold.
- The share of male and female customers, if the offer has such statistics (it is not calculated for every offer).
- The short description.
- Allowed traffic sources are marked with a check mark and forbidden ones with a cross. Take this list into account when you set up ad campaigns. If the offer has no lists of its own, the network's common lists apply.
- The action buttons: Getting started with an offer.
On the right, top to bottom:
- Payments tables by country or goal: Payments.
- “Goods” — for offers with item variants: Goods.
- The detailed description of the offer.
- “Offer news” — the last three news items: category, headline and date.
- “Flows” — your flows with this offer (an agency does not have this block): Getting started with an offer.
- “Promotional materials” — if there are any: Promotional materials.
- “Landings” and “Prelandings”: Landings and prelandings.
Payments by country and goal#
The payments table is the most important thing to read before you launch. The block title shows how the offer is set up:
| Block title | What is inside |
|---|---|
| Payments and GEO | One goal in the offer, and the rate depends on the country. The table rows are countries. |
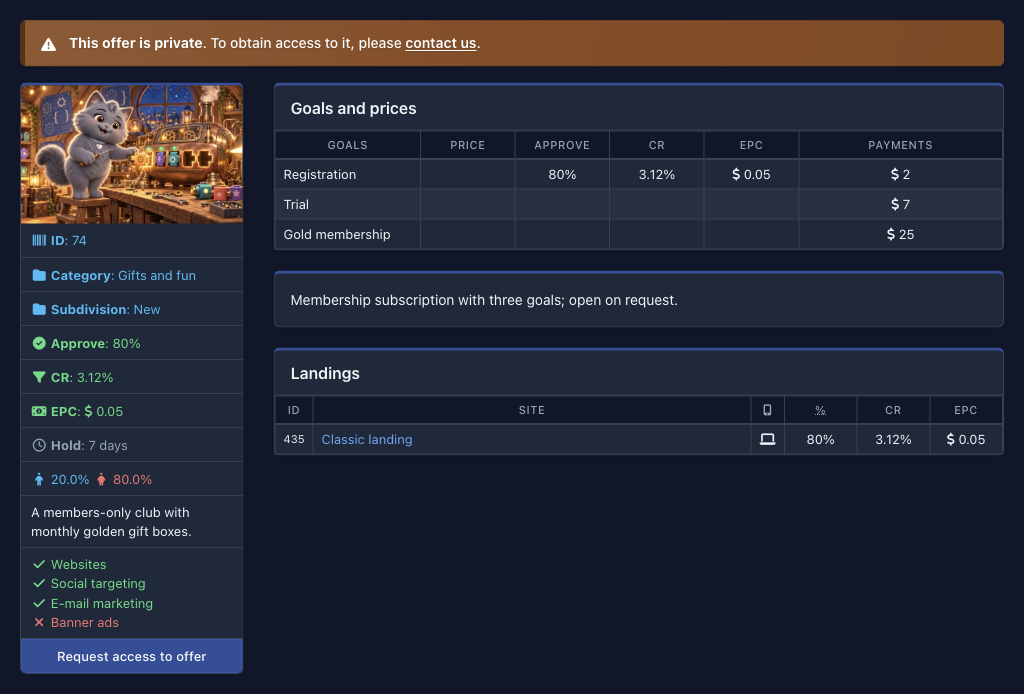
| Goals and prices | Several goals with no country attached, for example “Registration” and “Deposit”. The rows are goals. |
| Goal name | Several goals and several countries. Each goal has its own table, and its rows are countries. In the catalog, the same tables go in one block, and the goal names are separate rows. |
Three ways the payments table is organized.
For example, the demo offer Black Panther Slots has two goals and three countries. The “Registration” goal pays 6 (United Kingdom), 7 (Germany) and 3 (Brazil), and the “Deposit” goal pays 45, 50 and 20. Claw Quest has goals with no countries: “Registration” pays 2, “First deposit” pays 12 and “Repeat deposit” pays 4.
How to read the payments
The “Payments” column shows the commission you get for one confirmed lead. Usually it is a fixed amount, but some schemes are tricky. The value can have several parts joined by the “+” sign:
| What it looks like | What it means |
|---|---|
An amount with a currency, for example $ 8 |
The basic rate: a fixed amount per lead. The currency sign shows the currency, and for a currency without a sign the code comes after the number. |
A number with the % sign, for example 15% |
A share of the order amount. |
| A percentage with the “Cost” hint | A share of the order's cost. |
| An amount with the “Upsale” hint | An addition for each unit of the main item, starting from the second. |
| An amount with the “Cross-sale” hint | An addition for each unit of an additional item, starting from the first. |
| A part with the “−” sign | This part is subtracted. It is typical of dropshipping offers with costs, delivery costs and service costs. |
Parts of a value in the Payments column.
Hints appear when you hover over the value. If the administrator entered their own text for a row instead of a calculation, you see that text.
If the payments differ for desktop and mobile traffic, the column has two cells. On the left is a monitor icon (“Desktop traffic”), on the right a tablet icon (“Mobile traffic”). If the values are the same, there is one cell. For example, the demo offer Kitty Cam Pro pays 14 for desktop traffic and 19 for mobile traffic in the USA.
The table shows the payments that apply to you now. The network can set separate rates for a particular affiliate, team or agencies, and it can limit a rate to a period. Then different affiliates see different numbers for the same offer. A rate with a limited period applies to the leads that arrive in that period.
Goods#
If an offer has item variants, for example with different bundles, its page has the “Goods” block. It holds:
- The variant ID. You need it when you send a lead with the order composition (
leads/add, theitemsparameter) and when you send a lead manually. - The variant name.
- The variant price: one column per country (a flag in the heading shows the country, and its name appears on hover) or, with one country, the “Price” column. If the extra columns are on, “Min. price” and “Cost” appear there too.
Variants are divided into groups: “Main goods”, “Additional goods” and “Delivery processing”. If the offer lets you change prices, you set your own prices in the flow settings: Flows.
Hold#
Hold delays the commission: a confirmed lead waits first, and only then does its commission reach your balance. The hold period is in the left column of the offer page: “Hold: 7 days”. If there is no hold, there is no such line.
This period is the same for the whole offer. The network can set a different period for a particular goal, team or affiliate, and it applies to leads instead of the general one. The “Hold” phase is explained in the phase reference. To see the money in hold, go to the page Money and withdrawals.
Approve, CR and EPC#
These three metrics help you compare offers, but they are calculated across all affiliates of the network, not just you.
| Metric | How it is calculated |
|---|---|
| Approve | The share of leads that reached the Hold or Approve phase among all leads except trash. Leads waiting for a decision and cancelled leads are counted, trash is not. |
| CR | Leads without trash that came from the offer's landings, divided by clicks on the landings, in percent. Unique clicks are usually counted. |
| EPC | The affiliates' earnings on approved leads and leads in hold that came from the offer's landings, divided by clicks on the landings. It shows how much one click brings. |
Offer metrics.
The formulas are described in detail on the page Metrics and formulas. For multi-country offers and offers with goals, each row of the table has its own values.
The figures are recalculated in the background every few hours, so they do not change each time you open the page: Cached percentages. They use the statistics period that the network sets. Offers with no clicks and leads in that period keep empty values. Your own metrics for the offer are in the “Flows” block on the offer page.
Access to an offer#
An offer may not be open to everyone. The administrator chooses the kind of access, and you see the result:
| Kind of offer | What you see |
|---|---|
| Public | The offer is in the catalog, and you can work with it right away. |
| On request | Everyone sees the offer in the catalog, but you can work with it only after access is opened. Request access to offer appears instead of Create new flow. |
| Private | Only the people the network added to the list see the offer. For everyone else it is not in the catalog and not available by a direct link. |
Kinds of access to an offer.
Until you have access, you can read the terms and see the payments tables and the list of landings, but you cannot create a flow, download a site, open the promotional materials or send a lead. At the top of the page of such an offer is the warning “This offer is private. To obtain access to it, please contact us.” Under the details is the request button. The words “contact us” in the warning are a link to the request too.
-
Click “Request access to offer”. The button is in the catalog and on the offer page.
-
Send the request. The support service opens with a ready request that already names the offer. Send it. If the form has a message field, you can add an explanation.
-
Wait for the administrator's decision. When access is opened, the Create new flow button appears in place of the request, and site download and promotional materials become available.
An offer also disappears from the catalog in other cases: the administrator turned it off, blocked traffic to it, or closed it personally for you or for your team. A link to such an offer returns you to the catalog.
Getting started with an offer#
The Create new flow button is in the catalog and on the offer page. Click it and confirm the question “Do you want to create a new flow with this offer?” The flow is created and its settings open. What to set there is described on the page Flows.
The “Flows” block on the offer page shows your flows with this offer: the name (a link to the flow), approve, CR, EPC and “Total”, which is how much the flow has earned. The approve, CR and EPC columns depend on the network settings. If there are no flows, the block says “No flows with this offer”.
The offer page also has the Send lead manually button. It appears on offers that accept leads via API, if the administrator turned on the “Can add orders via API” permission for you: Send lead manually.
An agency has no flows, so its offer page has neither the Create new flow button nor the “Flows” block. The agency works with an offer by its ID. The ID is in the left column of the offer page and in its address (/offers/64). The whole list comes from offer/list.
The agency sends a lead for this ID with the leads/add request, or in the cabinet with the Send lead manually button. The button is in the catalog and on the offer page if the offer is open to the agency and accepts leads via API. The agency builds traffic links in the link generator.
Landings and prelandings#
The bottom of the offer page has two blocks. “Landings” are the offer's main pages, where the customer places an order. “Prelandings” are pages that lead the visitor up to a landing. They do not take orders themselves. If there are no sites, the block says “No landings added” or “No prelandings available”.
A site row shows:
- The site ID.
- The site name (or the address, if it has none). Click it to preview the site.
- A mobile icon with a hint: “No mobile device support”, “Redirects to mobile version”, “Optimized for mobile devices” or “Adaptive design”.
- Approve, CR and EPC of the site, if the network turned them on. These are the metrics of this very site.
- A download icon, if the site can be downloaded as an archive.
Sites that the administrator hid do not appear in the lists. Only people who have been given access see a private site. It is marked with a crossed-out eye and the hint “Site is private”.
Download a site
You download a ready-made site as a ZIP archive and host it yourself. The download icon appears in the site row when all three conditions hold: you have access to the offer, the site has a ready archive, and you already have a flow with this offer. An agency does not need a flow to download.
-
Create a flow with the offer. If you have no flow yet: Getting started with an offer. An agency skips this step.
-
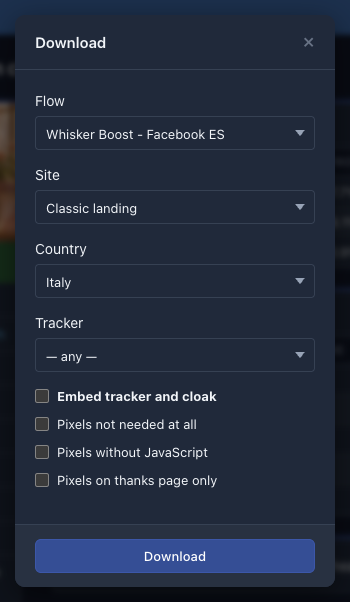
Click the download icon in the site row. The “Download” window opens.
-
Choose the options. The fields of the window are in the table below.
-
Click “Download”. The browser downloads the file
site-<site ID>.zip.
 1234
| Field | What it does |
|---|---|
| Flow | The flow to bind the archive to: the archive gets the settings of this flow. The field appears if you have flows with the offer. |
| Site | The site to download. The site whose icon you clicked is selected in advance. |
| Country | The country to use for prices and currency. |
| Tracker | Sets up the archive for your tracker (Keitaro, Binom or AlterCPA): the click ID from the tracker goes to the network along with the order. “Any” means no such setup. |
| Embed tracker and cloak | Adds the traffic filters and the white site from the flow settings to the archive. The checkbox appears if you have a flow with the offer, and it is unavailable while a tracker is selected. |
| Pixels not needed at all | No pixels are added to the site. |
| Pixels without JavaScript | Pixels are added in the short version without JavaScript. |
| Pixels on thanks page only | Pixels are placed only on the “Thanks” page. |
Fields of the “Download” window.
The agency's window has no “Flow” and “Embed tracker and cloak” fields. It keeps “Site”, “Country”, “Tracker” and the three pixel checkboxes.
The section Downloading ready-made sites explains what the checkboxes do and how to work with the archive after you download it.
The landing from the archive contains the file api.php, and your API token sits in it in plain text. Do not publish such an archive or put it anywhere others can see it. The details are in the description of the offer/download function. Orders from the landing go through the API, so the offer must accept leads via API, and an affiliate needs the “Can add orders via API” permission. An agency does not need this permission. A prelanding does not send orders, so it does not need the API.
You can get the same archive with a request: offer/download.
Promotional materials#
An offer can have ready promotional materials: banners, videos, audio and files. If it has them and you have access, the offer page has the “Promotional materials” block with a summary (“2 images, 1 video”) and the Show all promo button. The materials page is at /offers/<offer ID>/ads.
Materials appear as cards. A card shows a preview (an image, a video player, an audio player or a file icon), the name, the file size and, for images, the size in pixels. Hidden materials are not shown. Click View to open a window with the full preview, the name and the description. The Download button in it shows the file size.
If the offer or section is missing#
The Offers section may be missing from the menu, because the network can hide it from affiliates. Then the /offers address returns you to the home page with an access error message: If a section is missing from the menu. The network hides the section from the agency with a separate setting, and the same happens there.
If the offer you need is missing, check whether it is closed to you: Access to an offer.